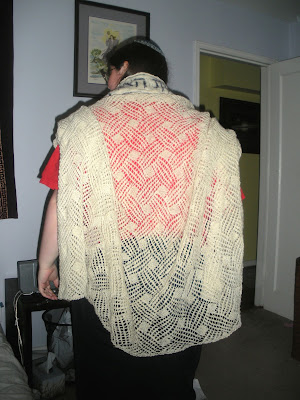
Whew! It's been awhile since I posted! I've been resting my shoulder, taking it easy, and working to finish up some big projects. Well, I did start a bit of spinning on my wheel, but I'm waiting until it is finished to do a full write-up. For today - I've (almost entirely) finished my shawl I started spinning just a bit more than two years ago.
If you are interested in my progress up to now, in
Part I I covered washing the fleece, in
Part II I covered prepping it, in
Part III I covered spinning singles, and in
Part IV I covered plying and finishing the yarn. In
Part V I covered starting to knit the shawl and in
Part VI I covered the detail work that I did for the neck band.There have also been two other progress reports on the shawl
here and
here.
Today I will cover all of the little finishing touches that it takes to complete a shawl. I weaved in the ends, blocked it, reinforced the "button" holes where I will be tying on the tassels, and sewed on the neck band. I still have to tie on the tassels, but since that is a religious task, I figured it was outside the scope of this blog.
First, I needed to finish knitting it. It looks about the same as it did the last time I showed you a picture, just bigger:
 |
| Finished shawl, before blocking |
After casting off, I spent a bit of time weaving in ends. Because there wasn't any colorwork, the only ends were where I switched skeins, and where I had to make spinners knots (because my singles snapped while plying). I find that the easiest way to weave in ends is just to do a
duplicate stitch for a bit, then snip off the rest. If the remaining end is long enough, I use a darning needle. If it is too short, I use a crochet hook. Either way, after a few stitches, it is very unlikely to come undone.
Next, it was time for blocking. In the past, I have just used
t-pins on a towel for all of my blocking, or just the towel for a light blocking.
But I wanted this to come out very rectangular and even, and it is very large. I had heard good things about blocking wires, so I figured I should try them. I also bought some interlocking foam mats to pin to.
The mats I bought come in sets of 9, and can be arranged in any configuration. This gives them more flexibility than a blocking board - if I had a 6-foot scarf, I could block that by setting them up end-to-end. They also store easier. I got two sets of them, but 18 still wasn't large enough to completely block this very large shawl, and some of the t-pins were pinned to the floor.
 |
| Interlocking foam for blocking surface - not quite large enough |
The blocking wires were really easy to use, but 1) they weren't quite large enough for the whole shawl, so I had to overlap them and 2) setting them up with the damp shawl on my lap was quite tedious. They did give a nice even block, even if I only used them on the sides of the shawl.
 |
| Damp shawl stretched out and pinned to the foam blocks |
When it was dry, I pulled it up and took out the wires. This part was quite easy.
Next, I wanted to reinforce the holes that I left to tie the tassels onto.
 |
| Corner of the shawl, with hole for tassel |
I saw several options for reinforcement. The most common was
whip stitch, but I wanted something really strong. There was also
blanket stitch, but that looked like it was more to reinforce a hem than for a small hole like a button. I ultimately went with
buttonhole stitch. It makes a series of knots around the edge of the hole, which are less likely to fray. And it is called buttonhole stitch, so it must be good for buttonholes.
 |
| Reinforced hole for tassel |
After watching a video, I picked it up pretty easily. It's always good to have another tool in the toolbox, even if I don't make things with buttons very often.
The last bit of finishing was to sew on the
neck band. I folded the shawl and the band in half and pinned it, so that it would fall in the right place. I used the t-pins to pin it up and down, because sewing on a stretchy fabric without bunching up is tricky.
 |
| Neck band, pinned and ready for sewing |
Then I just used some more of the same yarn for whip stitch all the way around. Unfortunately, it seemed to be sagging and uneven, but I was able to mostly fix it by lightly sewing around the letters.
 |
| Neck band, all sewed on, mostly evenly |
All that is left is to tie on the tassels! I am so excited to have this shawl. Remember, it started out with this:
 |
| Leicester sheep |
Which became this:
 |
| Locks of leicester wool |
Before I spun it into this:
 |
| Strands of yarn, with quarter for scale |
Finally, after many months of work, I have this:
 |
| Shawl, being folded as it is meant to be worn, on my shoulders. |


