header picture

header picture

Thursday, December 24, 2015

Can This Project Be Salvaged?

Three years ago I started a hat for my husband. I had been doing a lot of double knitting (which makes colorwork really easy, if time consuming) and decided to make an astronomy hat for him.

In double knitting, the back of the project is the photo-negative of the front. Astronomers use photo negatives to look at stars more easily. My husband is an astronomer. Ergo, I would make him a reversible hat that would show the moon and stars, and would be an astronomy negative on the inside. Since he is always cold, I would give it earflaps. And, just to add a bit of color, The ear flaps would portray a sunset.

I used MacStitch to design the moon, and I also added a shooting star. The stars themselves would be individual stitches placed somewhat randomly in the knitting.

I picked out my yarn: black (of course) and a variegated gray that I had to give the moon (and the negative) some texture. Since it was fingering weight, I doubled it to make worsted-weight yarn.


A good color for a moon?
It was going to be glorious. And then it all went wrong.

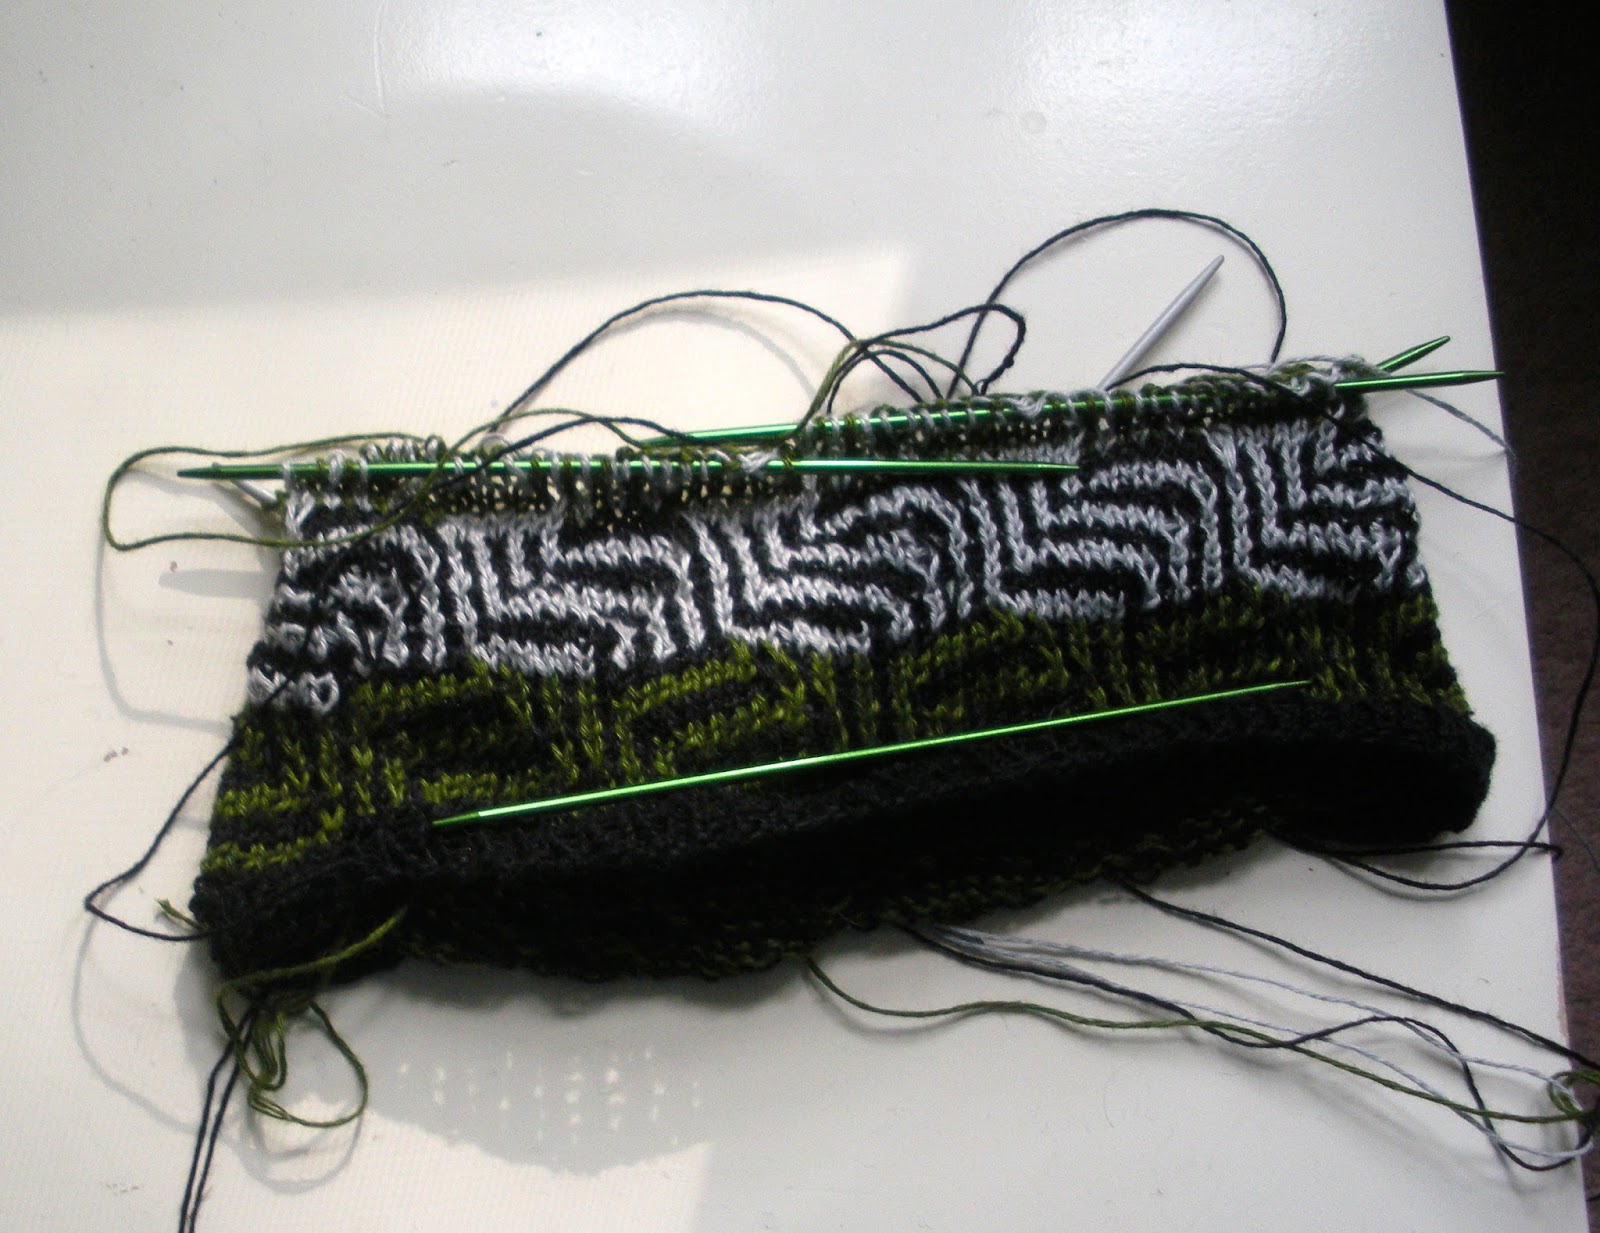
Mostly, it was simply poor planning. The pattern looked great! But I spent so much time thinking about the colorwork that I managed to make a mis-shapen thing that could only generously be called a hat.

Would you wear this?
So, 11 months after I started it, I shelved it and declared it a failure. But...

I never got around to ripping it out. I was so annoyed that I had spent all that time for nothing, that I was disgusted with the project. I didn't want to keep working on the sign of my incompetence. But I wasn't actually willing to pull it apart either.

So...

Today I thought I would have another go at it. I ripped back to the edge of the crown and carefully put it on a needle, looked at some patterns for earflap hats (to get a better sense of proportions) and got to work.

I hadn't recorded what needle I used, so I guessed a 7, but otherwise, there haven't been any major snags. It was a bit hard to figure out where the round starts too, but not impossible. It took awhile to get all of the stitches on the needle in the right order (double knitting means twice as many), but I am well on my way.

With a little distance from the disaster, it feels less like I wasted a ton of time, and more like a salvageable learning experiment.

My other colorwork hat that I have been working on is done. I will post on it when I have the pictures up.

Sunday, December 13, 2015

Wingspan Shawl

Finals done! Whoot!

Surprisingly, I actually got a lot of knitting done, though my spinning has been mostly on hiatus.

The end of the semester means a lot of presentations to sit through (no need for notes), not too mention our trip to Boston (which included an unscheduled 3 hour wait for our plane to arrive). It also helped that the Wingspan scarf was very intuitive, and consisted of nothing but knit stitches.

In other words, I have almost finished the scarf I was working on. I just need to block it, really.

Gradient Wingspan scarf. Not yet blocked.
I like how the gradient worked out, although the light green is a bit neon in my opinion. The short rows were really easy, and I can see why the pattern is so popular.

The edging was done with some black sparkly acrylic yarn that I have had sitting around. I think it was a gift, and I don't know the brand or anything, but I do have a lot of it. I wanted to use regular black yarn, but I didn't have any fingering weight black, and I refuse to buy more yarn for such a small project bit. I think the intended recipient will like it though.

Mystery sparkly black yarn
I like how the yarn looks, and I made a whole series of gloves with it awhile ago. But the plastic sparkles hurt my fingers when I knit with it, and I really prefer natural fibers.
Fingerless gloves from almost a decade ago
Anyhow, not much else to report. Progress on the linen hat continues. I will have some more time now, since the semester finished, so I can hopefully finish everything before the 20th. Sometimes it is nice to work with a deadline.

Monday, November 30, 2015

Sunday, November 22, 2015

Presents for the Holidays

Although I don't celebrate Christmas myself, I do have relatives who do. As such, the season is an excellent excuse to give myself a deadline and make some presents. I am working on just two this year.

First, a hat (of course).

I have been working on this project off and on for almost a year, but, since I told my uncle last December that I would send it to him, I figure it would make a good Christmas present.

He is allergic to wool, so I figured that I would use the linen yarn that I bought on a whim a few years ago. I had never worked with linen before, and it is a bit like cotton. However, even more than cotton, it does not stretch. At all.

All mistakes are much more obvious, although I haven't had any problems with muscle pains after knitting it that I have heard can be an issue. It also falls off the needles all of the time (I am knitting the project on double-pointed needles). After trying it, I think that linen is definitely better on the loom, but I also recommend trying it at least once, if only to better appreciate the loveliness of wool.

So, the pattern.

I am making a mosaic pattern, which is a color pattern that uses slipped stitches. The pattern is based loosely on the Amazing Hat by Melanie Hoffman. However, I have added an extra twist, by using three different colors, instead of two.

Amazing Hat
The linen is having an interesting effect with this kind of pattern as well. Wool or acrylic would stretch and make a mostly flat material. But the linen is making an interesting three-dimensional effect.

I hope I can finish this one in time. It doesn't travel well.

The second gift is a simpler pattern, but I spun the yarn on the wheel.

Last post I mentioned the gradient wool-silk blend that I was spinning on my castle wheel. Well, I finished the yarn, although the leather connecting the footman to the treadle broke, so it was finished on the other wheel. It also bled blue dye when I did the wet finish, but it doesn't look like it effected the color that much.


Loving the colors
I am making the Wingspan shawl. So far, the pattern is very easy, and great for knitting in class. This is my first time knitting with an unplied handspun, and I am worried that the fabric will bias. It shouldn't matter with this pattern though.
Still loving the colors
Hope they will both be enjoyed!

Thursday, November 5, 2015

Spinning Wheels

While there was a lot to learn when I first started spinning, it was all in about wool and yarn. The twist angle, number of plies, thickness of the yarn, washing, and finishing. Even dying and color. There was, of course, plenty to learn, but it was about fiber. As a knitter for 20 years, I knew about fiber. And what I didn't know, I had a basis for learning. One of the nice things about spinning, and why I think every serious knitter should learn it at least a little bit, is that it expanded on knowledge I already had. I see myself looking at yarn offerings at the store in an entirely different light.
But that was as long as I stuck to spindles.

There is something so simple and intuitive about a spindle. Sure, they come in a wide variety of weights and styles, but if you pick one up and twirl it around a bit, you know what you have. There are no complicated problems with spindle repair. (Not that spindle spinning doesn't require skill, but it is almost entirely in the realm of fiber.)

Basic spindle
But then I got a wheel. Not just any wheel, but a finicky vintage wheel that only sometimes worked. And I found myself in a whole new realm of knowledge.

I know almost nothing about woodworking. In middle school, our shop class made shelves, and that is the last woodworking project I did. But suddenly I was heading off to the hardware store for lubricant and dongles of all kinds, trying to diagnose a complicated machine.

A mysterious, complex machine

The crack in the foot pedal was the easiest. I bought wood glue and a clamp.

Everything else was mysterious.

Getting another wheel that mostly worked was very helpful. It helped me understand what the wheel was supposed to do and what it wasn't.

And, after much trial and error, I actually have a working machine. Yay! It still only has two bobbins, but you do with what you have. I've actually been spinning on it in the last few days, and it is beautiful.
Is that actual yarn I see on the bobbin?
It helps that the fiber is gorgeous and easy to spin. It is a mix of Blue-Faced Leicester wool and silk, and the colors are amazing. I picked it up at Maryland Sheep and wool, from knittyandcolor.


Not sure that this picture does the yarn justice.
You can see how bright it is.
Of course, now that the vintage wheel is working fine, I have started another project: decorating the Ashford wheel.

At first, I tried staining it dark. Then it turns out that beechwood just doesn't take stain at all. I am pleased to say, though, that I tested it first in a place that can't be seen, so no harm done (just the loss of money).

But I have added some decorations. That big, flat wheel was begging for some paint. Of course, my painting skills leave a lot to be desired, so I stenciled. I took the picture off the internet, used an exacto-knife to cut it into cardboard, and used a sponge to paint it on. I don't think it came out too bad.  What do you think?
A dragon taking off and landing
I know, there is still more paint to be added. I need to take another trip to the hardware store for supplies.

Sunday, November 1, 2015

Project Updates

I have been getting quite a bit done on the projects that I have mentioned before, so I figured it was time for a basic update.

First off, I mentioned back in July that I was making dryer balls with the combing waste from my shawl project. I have now felted five of them and have a sixth one stuffed and ready for felting. I finished off the last of that ugly green yarn that I made as an experiment.
Felted dryer balls
 They aren't exactly pretty, but they seem to be doing their job, and they scratched my itch to never throw anything out, even combing waste.

Speaking of the shawl, I have now finished two skeins of laceweight yarn, and I am currently plying the third, and final, skein. It has been a really useful experience to make so much yarn of the same type, and keep it consistent. I can tell that I have improved since I started the first skein. I am not sure anyone else would notice the difference though (or I hope not, they are all going into the same shawl).

In August, I talked about my spinning lesson and the experimental yarn with the blue BFL top. I have finished all of the roving I received, into about 150 yards of extra-bulky three-ply yarn.
Chain-plyed BFL top
I had initially over-plyed the stuff that I did in class, so I had to run it through the wheel again to make it more balanced. By the end, I think I was really getting the hang of Navajo plying though. No current plans for the yarn.

In August, I also wrote about a skirt that was on my needles. Progress has been slow (small needles, big project) but I have added a few more inches since I last wrote.
Beach skirt: a bit more modest now, but still racy
And finally, just last week I wrote about a hat that I was working on. The hat is off the needles and I have started a matching scarf.


I think it came out looking great! The crown was a bit of a challenge, mostly because the instructions were so over-wordy, but I managed in the end to figure it out.

That is all I have for now. Happy crafting!

Thursday, October 22, 2015

Brioche Hat

I needed a project small enough that I could knit it standing up (while waiting for the bus), interesting enough that I could do it for 20 minutes with nothing to distract me, but easy enough that I wouldn't need a pattern in front of me.

So I started another hat. Now you know why I have so many hat projects.

I actually already have a hat on the needles, but it is a complicated mosaic pattern on yarn that needs good tension (read: must be sitting down) on double pointed needles (read: doesn't travel well). I'll try to post something about that project sometime soon.

But today, I am going to talk about my new brioche hat.

For my birthday, my boss gave me a gift card to my LYS. Dangerous, I know, tempting me into the shop when I have so much stash to use already. But I was good. I bought two bulky-weight skeins of yarn, one solid, one variegated. They were super-soft (merino wool) and I was thinking that I needed a winter hat for myself, so I can stop borrowing my husband's.


Cascade 128 Superwash
I was looking for patterns that would highlight the two colors together. My mother-in-law has been working in brioche stitch, and it looks great, so I was thinking that I would try the same. I found a great brioche hat pattern in one of my knitting books: Weekend Knitting by Wendy Easton.

I don't use the patterns in my books nearly as much as I should. I have a bunch of them that I have bought or that have been gifts (that's actually most of them). I love my stitch dictionaries, but I rarely follow patterns too closely. And so many of the patterns I have are colorwork or need specific yarns: I would rather use the yarns I have.

That said, I had never tried brioche before, and I had heard that it was really hard. Having done it, it is not too bad, but takes a bit of time to get the hang of it and figure out what is going on. A youtube video helped too: trying to describe it is very difficult. But, I will put in my two cents: maybe it will help someone who thinks like I do.

This is the pattern in the round, which is easier (I found):

Set up (color 1): knit 1. *put yarn to front and slip 1 purlwise. knit 1 without putting yarn to back to make a yarn-over. repeat from *.

Round 1 (color 2): put yarn to from and *slip 1 purlwise (this will be color 1). yarn-over. purl two together (1 yarn-over of color 1 and one stitch of color 2). repeat from *.

Round 2 (color 1): knit two together (1 yarn-over of color 2 and one stitch of color 1). *put yarn to front and slip 1 purlwise (this will be color 2). knit two together without putting yarn to back to make a yarn-over. repeat from *.

Repeat rounds 1 and 2.

To do it flat, do a four row repeat: round 1 (color 2), round 2 (color 1), turn, round 2 (color 2), round 1 (color 1).

My hat looks like this so far:
Outside

Inside

The material is really stretchy and thick, and I love how the colors look.

Depending on how the crown goes, I might submit this one to the state fair.

Saturday, October 17, 2015

Sheep to Shawl: Part IV

Part I covered washing the fleece, Part II covered prepping it, Part III covered spinning singles.

As of today, I have about 750 yards of spun, plied, and finished yarn. I think I will be doing one more skein, but I am taking a little break first and working on some bulky yarn to keep myself from getting into a rut. Still, I think it is time to show off some of what I have been doing.

When I last wrote about this project, I was about of a third of the way finished with the first bobbin. Two months later, I have finished two full bobbins-worth of yarn, plied them together, and finished the yarn.

I have a lovely tensioned lazy kate for plying, and it really helps to keep the yarn even.
Yes, I keep my lazy kate elevated with a box of Apples to Apples
I keep the lazy kate a few feet back from where I am sitting, so that the singles have a chance to even out as they are winding on. I don't know how much it helps though, since they have been on the bobbins so long that they have settled and lost their twist energy (though it will return when I hit it with a warm bath later).

Where with spinning singles, the fact that I don't have a lace setting for my wheel was nice for a beginner (it gave me a lot of time to draft, since I was treadling 3 times for every inch of yarn) the lack was very much felt for plying. It took what seemed like forever, and not much to do but let it run through my fingers.

After I had finished plying, I wound it onto my niddy-noddy. I counted, and there were over 250 wraps of yarn on it when I was finished with one bobbin-ful, and I had two bobbin-fulls.

The first skein, I tied it with black yarn, because that is what I happen to have in lace-weight, and it doesn't really matter. The second was tied with the small bit of remaining singles. To tie it so that it won't get tangled when I finish, I wove the yarn in and out in four places. I have seen recommendations to "make figure-eights" but I never feel like just two divisions of the yarn is enough, so I make about 8.

Skein #1
Once I had left it on the niddy-noddy for a few days to settle, I took it off and got ready to finish.

When I finish yarn I usually don't thwack the yarn to make a halo, or anything fancy. Because there was still some lanolin on this, I just swirled it around in really hot water with soap to reactivate the latent twist energy and get out the lanolin and oils from my hand. Because it was so yellow, I also gave it a hot bath with some hydrogen peroxide. I don't think it really did anything though, comparing  pictures before and after. Maybe I need more in the bath, but I am afraid of ruining the wool.

Skeins getting a bath
I don't have a large house, so I did all of my finishing in our bathtub with a bucket and a lobster pot (which we do not use for lobster). I hung the skeins to dry in the same place with plastic coat hangers.

The last step, after they were dry, was to twist them up for storage, and weigh them: 4.8 ozs, 752 yards of fine yarn.

Progressing nicely!

Part V can be found here.

Tuesday, September 29, 2015

The Long and the Short of It

Which are better, long projects or short ones?

Long projects seem like they don't progress. You never have anything new to say about them:

"how is the sweater doing?"
"Fine, added another two inches this week."

They require a lot of advance planning at the beginning, then just stitching. And stitching. And stitching.

But... the payoff at the end is amazing. You can look at whatever it is and say, "I made that." It is the most gratifying feeling in the world.

With short projects, a larger part of them is the fun planning stages, and less is the relaxing stitching stages.

There is nearly instant gratification, though smaller.

They are easier to carry around.

And, there is more progress to share!

So, what do y'all think? Short or long?

Sunday, September 27, 2015

Vintage Patterns

I like vintage patterns in theory, but not so much in practice.

In theory, I like patterns that don't use frou frou yarns, that focus on colorwork and stitch patterns, and I don't mind something that doesn't have a contemporary look.

But, that is in theory. In reality, it is much harder to search vintage patterns to find one that fits my needs. Many of them assume that you have more time, so they use small needles. A lot of the colorwork patterns would require me to buy more yarn, rather than using the stuff I already have. Most of the ones I own are for sweaters, so it would take me a very long time to do more than one of the patterns. And they are never written in my size, so I would have to completely rewrite the pattern anyway.

But the pictures are still fun to look at (especially for the really ugly patterns). I picked up a whole stack of vintage patterns at a science fiction convention a few years ago, so let's see what we have.

Some of the pamphlets and magazines were quite old, and all of the patterns have a "classic charm":
Cover to one of the older titles
Others were from a less... glamorous era:
Can you guess when this pamphlet was made?
Some have patterns that look straightforward:

Others, seem more difficult:


But in all eras, the kids are cute:


The men are sporting:

And the women are fashionable:


Sunday, September 20, 2015

Working with Scales

As I continue spinning my laceweight and knitting my skirt, I want to introduce one of my essential tools: my kitchen scale.

Two essential tools
As you can see from the picture, I actually have two scales. The first one I got is a mechanical scale. It can measure up to 22 lbs. and is decent for weighing fleeces. Unfortunately, most spinning uses for a scale require measurement in ounces or grams. The second scale in the picture is an electric scale (it  is the one with the bobbin-full of laceweight singles on top). It measures in tenths of ounces, and is generally much more useful.

So, what can one do with a scale? The most common use for it is to split the wool (somewhat) evenly, so that when you ply, there is a minimum of waste. You can also do what I am doing in the photo and measure how much you have made, so that you make approximately the same amount for the next bobbin (or two). Of course, unless you have perfectly even spinning, the length will only approximately match the weight, so it won't be exact.

You can also measure the final product and get the grist (e.g. yards per pound) or simply the weight for sale.

But there are also knitting applications for a good scale, and they are under-utilized. 

For instance, if you are making a scarf, and you want to start a pattern in the very center, you can measure the scarf and the remaining yarn to see when they match. The yarn will weigh the same whether it is knitted or not.

Even better, you can use the weight to measure early if you are going to have enough yarn to finish a project. If you start a sweater, and you are a few rounds into it, you can weight it, compare that with the number of rows you will eventually do, and weight the remaining yarn to see if you have enough.

Tools are useful, and a scale is a great tool for planning out your work.

Bonus: a picture of my crafting desk (which I use for storage, rather than crafting):

Yes, I do keep my old straight needles in a vase.

Wednesday, September 16, 2015

More Hats: Cables

When I learned how to knit, my grandmother told me that she would teach me how to cable when I had mastered the basics. Somehow, I got it into my head that cabling was terrifically difficult, and only a master should try it. I have now learned better, but there are still some things to watch out for that make cabling a bit challenging.

1. Going back and fixing mistakes when you are cabling is nearly impossible without just ripping everything out.

2. The stitches can get very tight, so you need good needle control.

So, dipping into my apparently vast array of hats that I have made...

Cables!

Cable Hat #1
This hat was made as a mother's day gift out of some bulky yarn that I received as a gift. The pattern comes from an ancient pattern book of hats (well 1985) that my grandmother gave me for the illustrated knitting instructions. I have been thinking of doing a stash buster by trying to make every hat in the book at some point.

Unfortunately, because I used bulkier yarn than the pattern called for, the hat came out too big. I decided to try to fix it by lightly felting it. It got a bit smaller, but I think it lost some of the pattern distinctiveness along the way.

On to number two!

Cable Hat #2
There was no pattern for this one - I just did a rib for the brim, then "twisted" the parts that stuck out. I used a very thick bulky yarn, so I am sure it was warm for my brother until he lost the hat. The main problem was that the yarn was a tad underspun, so that I kept being worried that the yarn would break every time I made a cable.

Ok, final hat of the day.

Cable Hat #3
This one I made in a single weekend for my husband. I had been working on a hat for him for a while, and I finished it and realized that I had made a horrible mistake with the pattern, and it was unwearable. So I made him this hat to apologize. It utilizes both a "twisted" rib (it is basically a very simple cable) and mosaic knitting. I took the pattern off of Ravelry, and I rather like how it came out.

The one problem is that I used very large needles to get it finished quicker, so that it doesn't protect from the wind so well.


Thursday, September 10, 2015

You Get What You Pay For

One of the disadvantages of doing a craft that people don't do that much is that when your tools break, you have to find a way to fix them on your own.

Sometimes, this is easy. When my Ashford Traditional wheel breaks (the drive band snaps or something similar) I can get an Ashford basic repair kit that will have the parts that commonly need replacing. It is a popular wheel, so there are others to help with common problems.

Ashford Traditional in working order

Not so with my mystery wheel.

Mystery Wheel

I have mentioned before that I bought a mystery wheel off of Craigslist. The seller (an antique shop) said it was from the 1920s, but there is a strong possibility it is from the 1970s, based on wear and tear.

It has been a learning experience, and has necessitated many trips to the hardware store.

When I first got it, it needed some serious oiling. It also has a large crack in the foot board that needed to be glued and clamped. I had the glue, but had to go out and buy the clamp.

I got it working, but I didn't really know what I was doing. It was my first wheel. I didn't have spinning wheel oil, so I improvised with olive oil and later carbon dust (which is advertised for locks. It works, but it makes a mess). I didn't have an orifice hook, so again, I improvised. I made something-or-other out of hanging wire that is a bit like a sewing needle threader.

I started making some (funky) yarn.

But then, as it got later in the spring, and the heat turned off, it mysteriously stopped working. The treadle would turn, but the wheel would just not turn with it.

This is when I threw up my hands and bought my Ashford.

But I also stared at it, and thought, and thought, and stared, and asked people on message boards, and... I finally found a little hole in the side of the wheel. There was no screw in it, so at first I thought that the screw had come out. But no matter what I poked in there, I couldn't find the hole in the drive shaft. I looked really closely, and discovered that the hole had some metal. Ah ha! Maybe it would tighten with an allen wrench? (it helps that I had been looking at Ashford manuals to try to figure out how to fix my new wheel)

Success! Now I have two working spinning wheels.

The one problem is that my mystery wheel only has one bobbin. If I want to do any plying, I need to wind everything onto a drinking straw or other bobbin.

Bobbin from the mystery wheel

So, I did what any sensible person would do, and put out feelers on Craigslist for people willing to do a wood turning job.

I got two hits. Both seemed competent. One had a professional shop, but would charge more than I had offered and was 40 minutes away (I would have to go there to bring him the old bobbin). The other was closer and would do the job for less money. I chose the cheaper option....

and I got what I paid for. They look beautiful, but only one of the new one really works. The middle hole is crooked, so they don't spin freely. I'm not sure it is worth it to contact him and drive 20 minutes to get him to do it again.


Original bobbin on the left, copies on the right.
The maker did send me a number of cool photos of his process though.
Bobbins in progress


Thursday, September 3, 2015

Going to the Fair

This year, for the first time, I submitted some pieces to the State Fair. My mother-in-law submits beautiful work every year (and usually wins) but I had never considered it. She talked me into it though, and I submitted two pieces.

The first, my recently completed vest, I submitted in the category for knitted vests. It got a participation ribbon. I don't actually know what that means, since not all the entrants got one.

Vest on display with ribbon
The second piece, my set of trivets, won fourth place in the category of "other handspun item".

Terrible photo of trivets and yarn sample on display with ribbon.
Going to the fair was kind of weird though. It was like there were two fairs: the agricultural and craft fair, displaying the talents of Marylanders, and an amusement park. At the state fair I went to growing up, it had both, but they were on opposite sides of the fairgrounds. Here, they were all mixed together.

The produce competition:
best set of 8 corn cobs
Craft competitions:
Craft competitions, mostly quilts and needlework in this area
 Amusement park:
Stoned penguin and squids?
And it seemed like the two parts of the fair didn't mix that much, except that parents took little kids to see the farm animals.

I did get to see some gorgeous knitting (and other crafts). Maybe it will inspire me to be a little more careful with my next project, so that it holds up to close scrutiny.