Our daycare provider tells my husband (who usually does pick-up) that our baby's hands are cold when they go outside to play. Last winter he was immobile enough to just put a blanket over him. This winter, I guess we will need mittens.
Of course, we'd have to trek to a specialty store to get anything in his size. And I want to attach a cord so that he doesn't lose them when he inevitably hates them and takes them off (as he does to his socks). Online options look overpriced... I guess I'll make him a pair.
Luckily(?) I have a sick day that involves lots of trips to the bathroom but not actually feeling that sick. So, I cast on a pair of mittens to occupy myself, and manage to finish by the end of the day.
Well, I won't leave you in suspense, they come out looking like this:
Pair of red mittens with cord. Quarter next to them for size.
I made them out of a ball of mystery yarn that I have had in my stash forever. I found it under a bed in a hotel room in Israel in 2005. Burn test shows it to be wool, and it is a pleasing barber pole of reds, browns, oranges, and a bit of blue. I found it in a ball, so I actually don't know the full extent of the color changes - for all I know, it's green in the middle!
Pattern notes: It might look a bit better if I used a smaller set of needles for the initial ribbing. I did a longer ribbing than the pattern called for, which will hopefully keep the mittens on NEB's hands longer. And I liked the instructions for the i-cord: simple and to the point.
I haven't made mittens in awhile, but I had quite a glove kick my freshman year of college. I only found pictures of 3 pairs, but I'm pretty sure there were a few more than that.
Blue mittens with white stripe made for charity, made in 2005 or 2006
Self-striping sock yarn gloves in crazy colors. Made for my cousin in 2006.
Sparkly black fingerless gloves. Also made in 2006.
Gloves are a great project for people who really like socks but want to do more fiddly bits. Even the mittens can get a bit fiddly with all of the needles and stitches on holders. I would not recommend magic loop as an alternative to double pointed needles if you are making gloves - there are just too few stitches on each finger.
Almost finished with the main part of the baby mittens.
Stitches on three double-pointed needles, thumb gusset on a stitch holder.
Anyhow, I finished up the mittens in one day and NEB has been wearing them. Not sure why I bothered to put thumbs on them though, since he hasn't figured out how to use that part of the mitten.
People often assume that it is cheaper. Sometimes it is, especially if you start from very basic elements. If you grow the vegetables yourself, the salad is pretty cheap. But most of the time, if you added up the cost of all of the materials (yarn or wool) and tools (needles, spindles), the handmade item is more expensive than a basic version you could buy in a store - even excluding the cost of your time.
So, what is the value?
Customizability is certainly one value. When all you start with is some wool and a dye pot, your imagination is the limit. And, when you are talking about clothing, being able to tailor the clothes to your own unique body shape means a lot - especially those of us that the fashion houses rarely cater to.
Limits can be good in art - some people have made
amazing things when they limit themselves to just a pen and paper- but so can free
expression. And the more basic a material you start with, the more free the expression. If I quilt with factory-made fabric, I am limited to the prints I can find in the store or in my closet. If I crochet an afghan with millspun yarn, I am limited to the colors that I find on the shelf.
Speaking of crocheting afghans:
My mother, repairing a multi-colored granny-square afghan
I always knew that my mother crocheted. But she had basically stopped by the time I was born. I remember once, I got a (non)Barbie doll, and I didn't have clothes for her. My mother quickly crocheted a little pair of pants. But that is the only time I ever remember my mother crafting.
But then I was visiting for Thanksgiving this year and she had pulled an enormous afghan out of the attic guest room. I had seen it growing up, but I don't think I had ever realized that it was made by her. She had pulled it down out of the guest room because it was disintegrating - wool moths and neglect. It was mostly acrylic, so much of it was intact, but apparently the yarn used to crochet the squares together was wool. So, although it needed a good amount of repair, the essence was still there.
So, for the first time ever, me and my mother sat and crafted side-by-side. I worked on my sweater, and she got out her crochet hook. She told me the story of the afghan. How they had moved into an apartment and found a bunch of granny squares in the closet. How she had started making more squares out of whatever yarn she could find in the bargain bins. How she realized that she had made far too many, but was determined to crochet them all together. How she liked how it had turned out, but it was enormous and heavy - almost a king-size bedspread. How disappointed she was that it had been neglected.
Which brings us back around to the value of handmade things. Handmade things have stories. Handmade things are connections to people. Even when they are not customized for you.
Baby sweater we received from the family for NEB. The label inside has the name of my mother's youngest cousin - who got married when I was 10 or so.
With modern manufacturing, we certainly have more stuff than people did in the past. But we rarely treasure our stuff. I like using our bread machine that we got as a wedding gift. But it is breaking, and, while I'm annoyed that we have a disposable society, where things are not usually made to be repaired, we are just replacing it. Now, obviously, we can afford that because we are fortunate to have good jobs. But I feel like even people who cannot afford to just replace things don't have a sentimental attachment to the items, just worry that they will have to do without.
But handmade items are different. Time went into them. Thought went into them. They are worth passing on as more than just stuff.
We are blessed to have many crafters on both sides of the family. And, as the oldest cousin on my mother's side (and the first to have a child) we got many heirloom sweaters. My husband is the second oldest cousin in his family, but, since his brother lives overseas, we got many sweaters from that side as well. We can't remember who made most of them (though a few have labels), but I wanted to post pictures of a just a few to honor them. There are many, many more.
Made by my MIL. Still too big for NEB, but he will grow into it.
The sweaters are in many styles and abilities. Some were made for my husband or his brother. Others were made for the previous generation. My last post was on gifts that were hand made just for NEB. These are the gifts that are being passed down.
Babies grow fast, so clothes are worn only a few times before they're outgrown. This is true whether or not the maker spent many hours on the gift.
Blue and white sweater of unknown provenance. There is a matching hat.
And, of course, sweaters can only really be worn at certain times of year, and in certain climates. My brother-in-law was born and spent the first few years of his life in Los Angeles. Not many cold days there. NEB didn't ever wear some of the ones we received, as he was the right size only in the heat of summer.
Very small, cute pullover. It has matching pants, but they are two or three sizes larger.
Still, it means something special to us that NEB can wear his family history. And we will be sure to take care of them so we can pass them on when it's time.
NEB wearing a brown sweater. It has a label with name of my mother's brother.
We happily have an abundance of talented crafters in our family. Today, rather than talk about my current projects, I thought I would share some of the homemade gifts that were made just for NEB, our little boy.
Before I get into specifics, I'd like to wax a bit sentimental. There is just something so special about homemade gifts. With a store-bought gift, you have the gifter's thoughtfulness of their choice and the use of the item. If it is a really perfect fit to your personality or it is bought on vacation, you know that they were thinking of you in particular when they could have been thinking about something else. I have nothing against store-bought gifts.
But a homemade gift is a different level. Someone has given you the gift of time. The gift of effort. They have spent hours and hours (and hours) thinking about you and putting their intention (dare I say love?) into the item.
NEB was loved by many even before he was NEB.
So, the gifts, starting with one from me and my husband. I have talked in detail about it before, but I haven't ever published pics of the finished piece, except on Ravelry. G picked out yarn and I made a blanket; NEB is sleeping under it right now. Not much else to say except that I mostly like how it came out. I think I cast on too many stitches though, so the shape is a bit weirdly wide.
NEB under blanket last spring. ETA: hat made by grandma.
I hope that he appreciates the love I put into it when he is older. The nice thing about baby blankets is, unlike baby sweaters, they you can't really completely outgrow them. I had a baby blanket on my bed to keep my feet warm until college.
Speaking of baby blankets, we got a lot of them as gifts. Most were store-bought or hand-me-downs, but two others were made just for NEB. The first, from my aunt, was a large sewn quilt. NEB spent a lot of time on it doing pushups before he could crawl. It had a lot of interesting fabrics for him to stare at.
NEB on quilt from Aunt R in February
The second blanket was from the grandmother who taught me how to knit. It is a turquoise cotton lace blanket. I didn't use it much, because we were using the one that I made, but it should make a great lap blanket in years to come. It has a nice, heavy drape, and a lovely feather-and-fan pattern.
Lace blanket from grandma, draped over the babygate
Speaking of gifts from grandma, she also made a sweater and matching hat. I already posted a picture of NEB wearing those, though.
Another of my aunts made NEB a whole set of hats, in different sizes.
Some, not all, of the hats from Aunt C.
He has worn many of them, some he is still too small for, and a few he never wore, since they only fit him during the summer months. It is a great pattern though, and the hats are adorable. The next child to use them might be a summer baby, and will use the ones that NEB didn't.
And the last homemade gift (that I can think of at the moment) was a bunting from my mother-in-law.
Warm outfit for NEB from my mother-in-law
It's gorgeous (like all of her work), and warm. It has a hood and even a pocket to fit a car seat buckle through. And... it confused us, so NEB hardly wore it. G, who usually does the dressing, didn't even realize that the bottom was closed up. So he thought it was designed for a much larger child. My mother-in-law says that she dressed him in it a few times to take him out on walks while she was watching him, but that's really it.
Well, that is the downside of making gifts for infants. They grow so fast that sometimes they only can wear it a few times - or never. But there are always more infants, and the items get passed on to be worn by someone new. As the first great-grandchild on one side, and the first one in awhile on another, NEB probably got more than his fair share of new items.
He also got a bunch of homemade hand-me-downs. But I'll save them for another day.
This month I am going to talk about three projects that I have been working on recently: one just finished, one that I am right in the middle of, and one just starting.
Each part of a project has its charms. When you are just starting, there is the excitement of trying new things, planning (I do it sometimes, I swear) and dreaming, and puzzling out how it is all going to work. In the middle, you are getting the hang of it. You often can just let your fingers remember the pattern and relax. At the end of the project, you start seeing how it will finally look. You get to get out of the rut you have been in for the middle part and do some finishing to make it look just right.
We'll start with the end.
Finished shawl, delivered to recipient
A few months ago, I told you about a lace shawl I was working on with handspun and commercial yarns. Well, I finally finished! I always forget that triangle shawls knit up fast at the beginning and get slower and slower as they go along. So when I think I am three-quarters done, I am actually only half done (or less).
That's the first thing about finishing - it can seem to take much longer than it should. What do they say, the last 10% takes 90% of the time? Not so true in knitting, but it can feel like it!
Once the shawl was actually cast off, I still had to weave in ends and block it.
Pre-blocking, post ends-weaving:
Shawl, pre-blocking
In this case, I wanted to block it in such a way that it would preserve
those beautiful waves on two edges. So I could only use my blocking
wires on one edge, and just t-pins on the others.
Mid-blocking:
Blocking on the blocking mat
And finally I had to get it to the recipient: a friend who has a fondness for pink and purple.
Completed:
Wearing the shawl
Ok, now for the middle.
Since May I have been working on a spinoodling project. (Like noodling, but spinning. Get it?) I needed something that was portable, and wasn't ready to start something big, so I took out some yummy fiber and my Ashford spindle and figured I would let it speak to me. Again, I didn't really plan out where I was going with this project.
The wool is not a specified breed, but it is mill-prepared, combed top, with a nice variety of shading. I spun it for awhile and I tried to do it less fine than my previous spinning project. I have half a pound of the fiber, and I don't want to be spinning it forever!
But I guess I've reached that stage in every spinner's life when I have to relearn how to make thick singles. my hands just don't want to do it. And, of course, it's easier to thin a thick part of the yarn (untwist and tug) than to thick a thin part.
So after I had been spinning awhile, I decided that only a quarter of the wool would be used to make a single this thin. I would try making a fluffy, thick single to ply it with. Well, a couple weeks ago I wound my thin single onto my spindle bobbin (reusable straw) and started my thick single.
Thick single on spindle, thin spindle on straw
It's hard! My hands keep wanting it to make it thinner! After a bit of spinning, I started spinning the top from the fold. Thinking about it, I really wanted a nice fluffy yarn from my second ply, to really contrast with the first ply. It's definitely good practice to retrain my hands though. Hopefully, I'll be able to post beautiful pictures of a lovely art yarn when I finish, and it won't vary too much from start to finish (unlike my first major yarn - oy!).
Two mismatched ends of the same scarf. Made from my very first major spinning project.
And finally, we get to the beginning - of a new sweater, that is. This has been many years in the works. Way back at the 2014 Maryland Sheep & Wool festival I got three large skeins of an alpaca/wool blend to make my husband a sweater with.
As usual, I miscalculated the colors I should buy. I always want to buy sets of three colors. Two that match and a third to tie it all together. But so few patterns are written for three colors! So I usually have to find a two-color pattern and modify it. As I am planning on doing here.
My husband always cold, so a nice alpaca sweater will be much appreciated. And the wool in the blend will hopefully keep it from growing too much during wear. I'm a bit worried a how loosely plied the yarn is - I can only hope that it wears well and doesn't pill. From my notes, it appears that I was planning on doing fair isle. But, I don't feel like it (so there). I picked a mosaic pattern: Shulz by Mary Kate Long.
It is top-down, so I am having fun right now with complicated short rows and picked up stitched for the shoulders. It doesn't look like much yet, but I can see the possibilities...
Man, who knew a baby would take up so much time? Definitely not updating this space as much as I would like. But between taking care of NEB, being sick, and helping campaign for the midterms (if you live in the US, you should make sure you are registered to vote, ASAP), I haven't found the time.
In fact, I've only been doing a bit of crafting here and there. I am almost finished with my lace shawl. No, I did not get it in for judging at the state fair. In fact, I have three more rows to go before I can start weaving in ends and blocking. But it is going to be beautiful, and I hope the intended recipient loves it!
Speaking of the state fair, I didn't do as well this year as in previous years. I think that is because more people are submitting - so I don't have any complaints! My entrelac scarf didn't place (lots of competition in the "scarf" category), and my lace prayer shawl got third for the category of handspun shawls. It also got a presidential ribbon though, so someone liked how it looked.
Other than the lace shawl, I've worked on a couple of quick projects in the last month or two. Both of them would fall into the category of "decorations," I guess, which is not something I usually dabble in.
The first project was for the Jewish holiday of sukkot. Most of the details of the holiday don't matter, except that we build a hut (sukkah), usually with cloth walls, and branches for the roof. It's traditional to decorate the sukkah, either by hanging harvest products from the ceiling, or making garlands.
Last year I attempted to make popcorn strings. They were... ok. But they were dried out by the end of the holiday, and they didn't look too good after getting rained on. This year I thought I would put my fiber arts skills to good use and make garlands out of yarn.
I used a technique called finger knitting. Basically, you treat your fingers as a knitting jenny/knitting loom. There isn't much variety in the stitching, but you can make a long chain in whatever color suits your fancy. And it is quick, and doesn't require any tools except the yarn itself. When I taught knitting at a day camp, they would send me bunks of campers who would have 45 minutes to learn how to do something with yarn. And I would usually teach them finger knitting. Their finished products, depending on how long they were, could be bracelets, necklaces, belts, or jump ropes.
Me, hand knitting a garland for the sukkah
Anyhow, I wanted nice long chains that I could hang up in my 8 foot cube of a sukkah. It was a great way to use up yarn that I wasn't too fond of, particularly stuff that I thought was too loud. Nothing is too loud when hung from the ceiling outside.
I ended up with three long chains. The first was a pale yellow yarn paired with a fall-colored variegated yarn that was supposedly one of the color pallets from World of Warcraft (I don't play, so I can't attest either way).
WoW yarn used in garland #1
The other two were other loud, bulky yarns that have been sitting in my stash forever. I'm pretty sure I have posted about them before, in my post on ugly yarns. The pink yarn was paired up with a black sparkly yarn that is nice, but a bit scratchy for clothing.
Unknown ugly pink/blue/orange yarn
Black sparkles yarn
Any how, all three garlands looked great hanging up, and I should be able to reuse them next year. My husband suggests that I add one more each year. We'll see how long that works out. It is a great way to use up yarn.
Garlands hanging from the roof of the sukkah (view looking up from below)
Garland at entrance
The second decorative art project is for little NEB's Halloween costume. He is going as an acorn, and I wanted some oak leaves as accessories. Ravelry is amazing. I just typed in a search for oak leaf patterns and a few came up. I ended up making a pattern by Frankie Brown that was pretty perfect.
Knitted oak leaves for costume, in brown and red
I made them on size-9 needles, with two yarns held together, so they came out bigger than the pattern (which is on size 6). The larger one is red and light brown, and the smaller one is dark brown and the same light brown. The plan is to tie them on as an arm band.
That's all for now. Maybe I'll write again before 2019.
Sigh. Started another project without much thought or advance planning. Then I (rather foolishly) told the Maryland State Fair that I would be submitting it for judging. So now I have a bit less than three weeks to finish it.
All that said, it is coming along beautifully. It is a lace shawl, and I am actually following a pattern (no really, the only change is to the yarn. Well, and the needle size. But, the rest, I swear, is following the pattern). The pattern is Ilo, by Heidi Alander. It is a two-color, triangle lace shawl using something akin to the feather and fan stitch.
For my main color, I used some rough handspun. I spun from the lock, and I mixed mostly white lincoln wool with colored mohair locks in pink, purple and blue. It came out quite pastel. You can read more about it here, here, and here.
Mohair locks
Lincoln locks
Singles yarn on the spindle
Pastel yarn in the skein
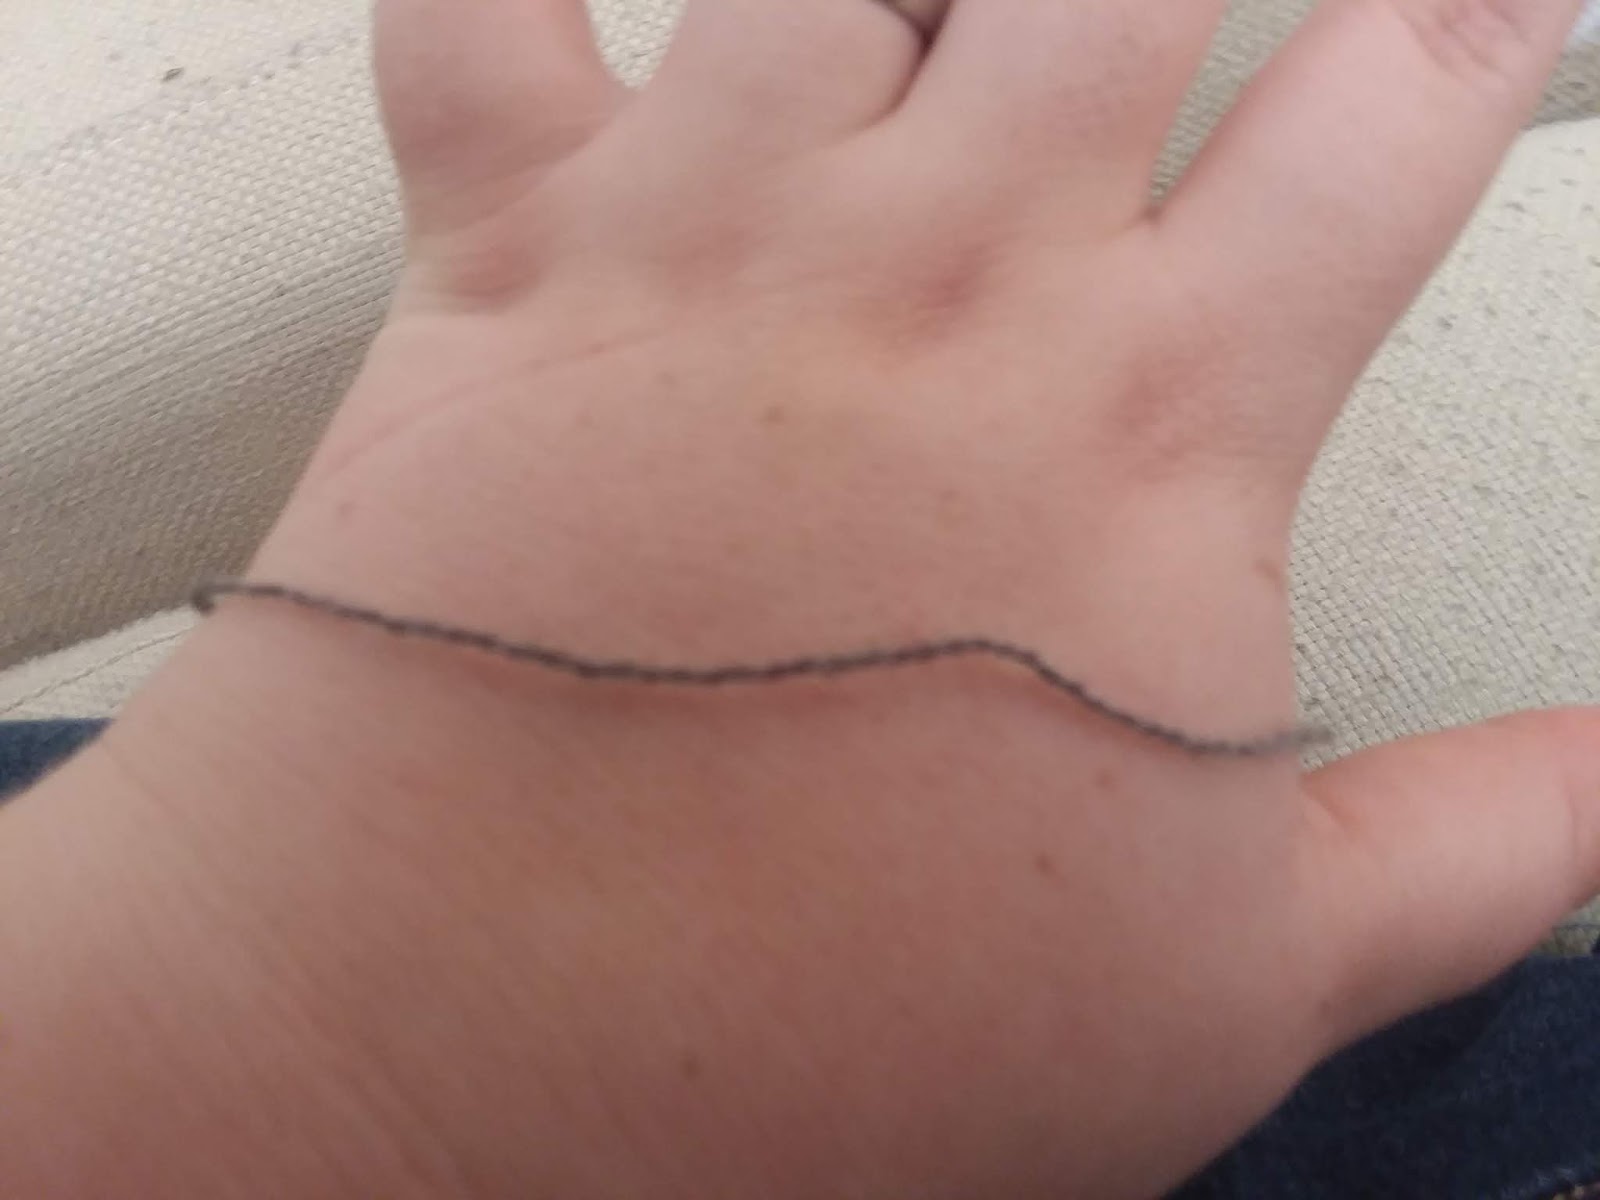
For my contrasting color, I used a gray yarn that has been sitting in my stash for awhile. It is either laceweight or cobweb weight, and I once made a lace shirt out of it.
Fine gray yarn
It is a mystery yarn, since I bought and balled it before I documented every purchase on Ravelry. I think I bought it in college though, and I know that I got it from a vendor at the science fiction convention Arisia. It feels like wool. It is VERY fine, and quite delicate. I am doubling it for this project, to more closely match the weight of the other yarn.
Yarn across my hand, for scale
So, the project started out well.
Beginnings of the shawl, with balled yarn
I was a little worried that because the shawl is a triangle, the blocks of color would look odd: early on, the blocks would be large, but later they would be narrow. So far though, that hasn't happened. It looks fine, I think.
Current state of the shawl, as of Aug 5th
What has happened is that I have discovered that one of the balls of the gray yarn has gotten damaged. I don't know what caused it, but there are many breaks in the yarn. This means that I have to splice a new thread every row or two. An unpleasant surprise, to be sure, but not insurmountable.
Well, since I have some baby-free time today, I should be knitting, not blogging! Off I go.
Currently working on a scarf using entrelac, so I think I will talk about entrelac today.
Entrelac means "interlaced" French. It is a technique that can make a very nice "woven" texture if done tightly, and a pleasing checkerboard if done loosely. But I'm not going to teach how to do it here. There are much more qualified teachers online, and I encourage you to find either a video or written description and try it out.
Here I am going to talk about two things: how entrelac is a great technique to play with colored yarns, and the importance of learning backwards knitting if you want to do very much of it.
I have done a few projects using entrelac. The first one I tried was a large triangular shawl in 2012. The nice thing about doing a triangle with entrelac is that you don't have to do the side triangles, so there are almost no short rows. I knit it loosely, starting with 25 squares of 10 stitches each. There wasn't much of the entrelac texture, but I liked the checkerboard pattern it made.
Entrelac shawl from 2012 in black and blue
My friend modeling the shawl
I made the shawl with sock yarn on size 6 needles. Notice how the technique is a good way to highlight a variegated yarn with short color changes. The solid color makes the variegated color pop, and the small squares allow you to have color pooling in a large project.
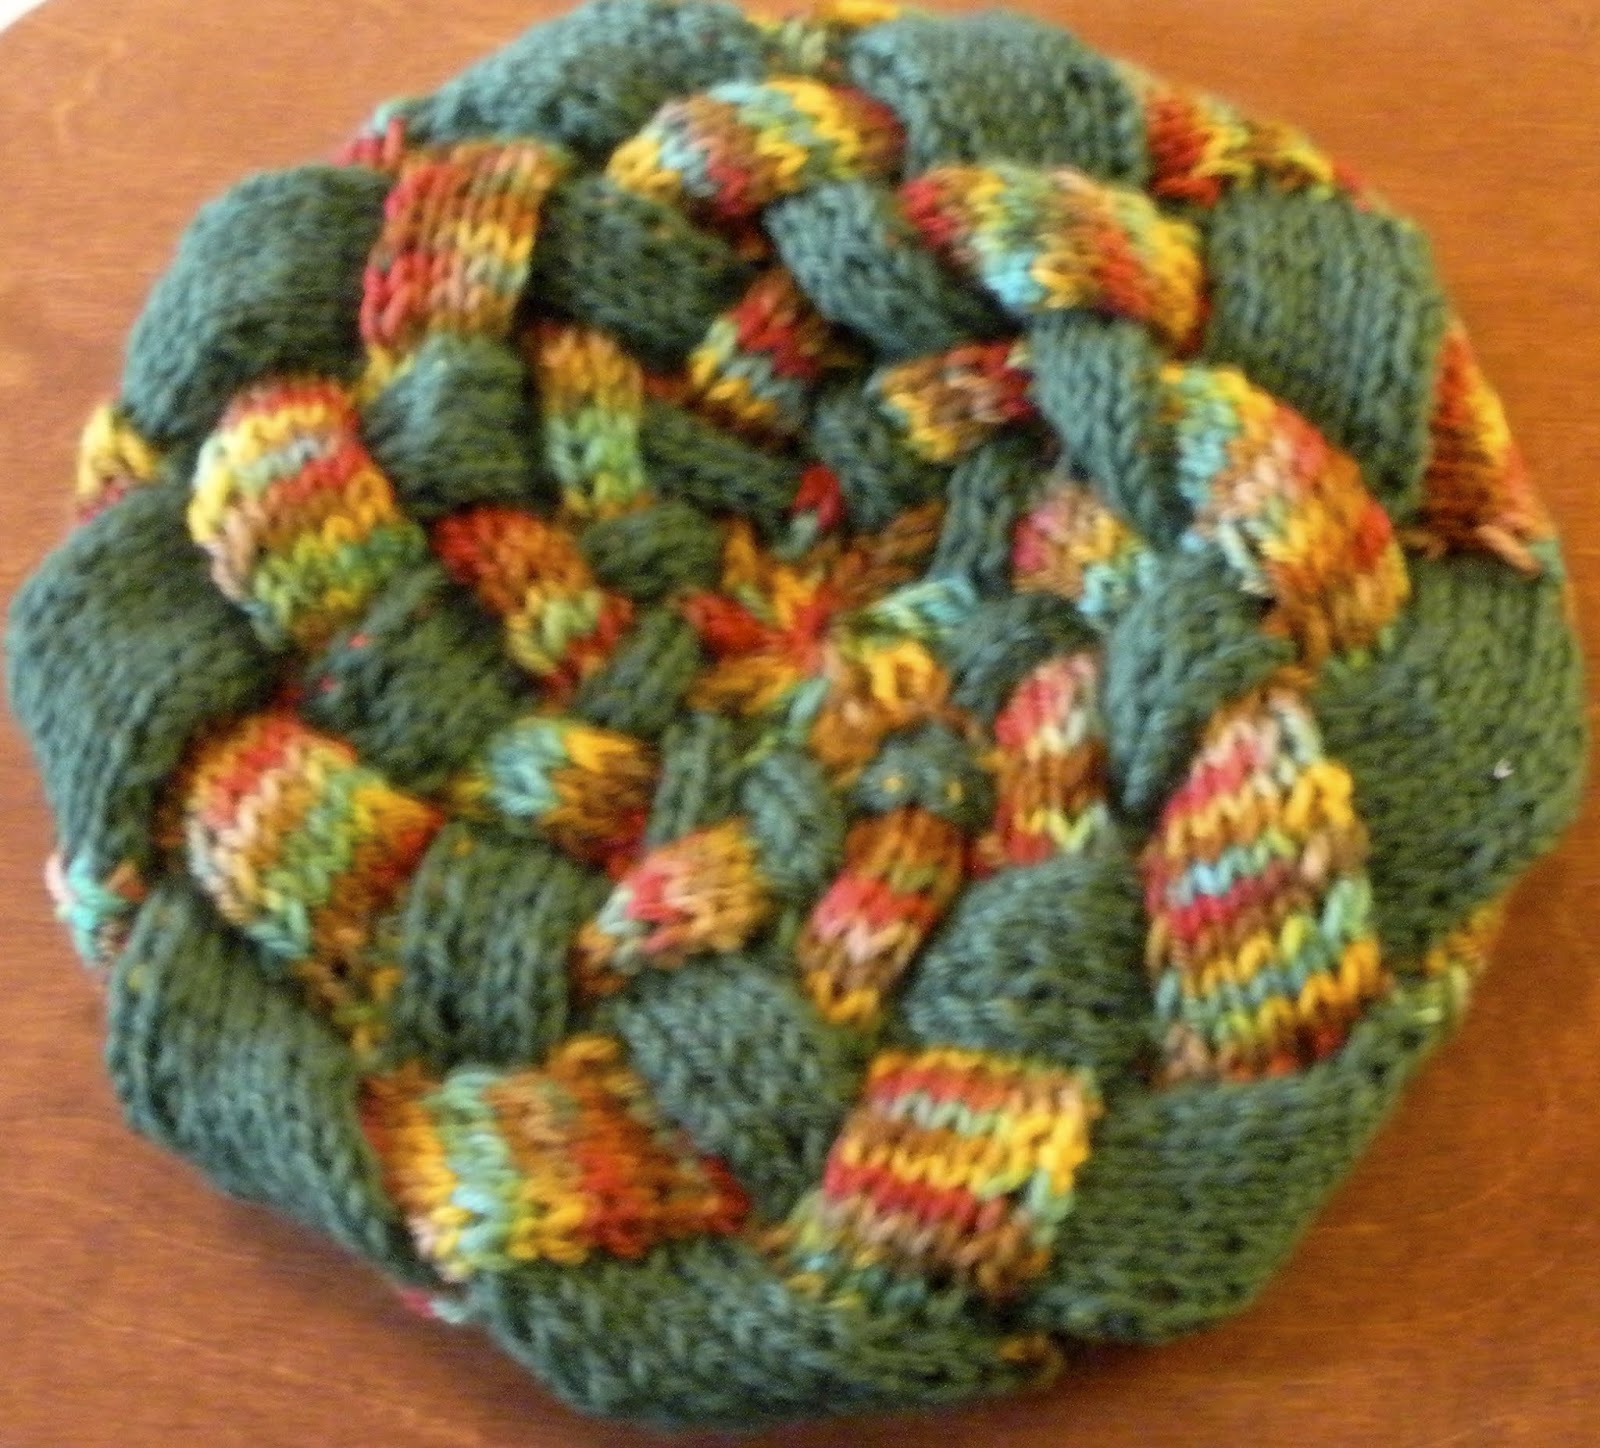
I also made an entrelac tam with a similar set of yarns, although this was knit tighter, and with thicker yarn:
Entrelac tam in green and multicolor
Notice that with the smaller needles relative to the thickness of the yarn there is a significantly tighter knit, and that the interlacing is more pronounced. But again, alternating between squares of a solid color and a multi-color yarn with a short repeat highlights the multi-color nicely (even if, as in this case, the yarn has so many colors it might derisively be labeled "clown barf").
I also made a similar hat without the solid color.
Entrelac tam in shades of blue
This time, although the texture similarly comes through due to the tight knitting, the variegated yarn by itself confuses the eye. It is no longer so clear that it is an ordered interlace. I also want to highlight that this is a slightly longer color repeat, so that most squares are pools of one or two shades, rather than the hodgepodge of the previous yarn.
One final tam. This one was made with only solid colors.
Entrelac tam in black, green, blue, grey, and white (side view)
This one highlights that entrelac is a great vehicle for scraps. The solid colors make the patterning really clear, but it looks less like weaving than when you alternate between two colors.
Finally, we get to my current project. This is the first project where I had to do the side triangles (since the hats were knit in the round), and I was dreading it a bit. Turned out to be pretty easy to pick up if you are already familiar with entrelac. I was glad that I did a triangular piece first, though.
The current iteration is actually my 4th attempt to make this scarf. I started it in April with my own pattern that I wrote. It was essentially a basket-weave, but at a slant so that the scarf would be a trapezoid instead of a rectangle.
Scarf: first attempt
I was making it for my husband with a gradient yarn I spun on the wheel. I call it a gradient, but while it continually changes colors, there is some repetition, rather than just gradually going from one shade to another. But then I put it down to make the baby blanket and the baby blocks.
Even before I put it away I was not too fond of how it was coming out. The pattern turned out to be a lot of work to keep track of, but you could barely even see it with the color changes. And it was tight on the edges, so that it wouldn't be stretchy like you want in most knitted garments. But coming back to it a few weeks ago, I could finally let go and frog it.
Sometimes, you see something coming out badly, but you don't want to change course because you have already put so much effort into it. But when I came back, I realized that it was even worse than I thought before, and I had an easier time forgetting all of the earlier work. So I ripped it all out and started anew with a new pattern. I thought that entrelac would be a great way to highlight the gradient of a long change variegated yarn.
At first I cast on 25 stitches, for 5 squares of 5 stitches each. After a few rows of it, I realized it was going to be way too wide, so I started over. This time, with 20 stitches, for 4 squares of 5 stitches each.
Scarf: third attempt
It was coming out really nicely, but it was still a bit wide. That might have been ok, but I was running out of yarn (I weighed, and my scarf was going to only be 18 inches long).
Finally, I settled on 16 stitches cast on, for 4 squares of 4 stitches each:
Scarf: 4th attempt
Hopefully, this is my final version, though it will still be a bit short. This process though has really highlighted how different entrelac can come out based on the colors of the yarn and the size of the squares. Even though it is the exact same yarn, because the squares are different sizes, the scarf has a bit of a different feel each time I do it again.
You may have noticed that a square of four stitches means that with regular knitting I would have to be turning the work every 15 seconds. Luckily, I have learned backwards knitting of a sort. That means that instead of turning the work and knitting, I just start going the other way. It is great for entrelac or short rows, but works for any kind of pattern. I backwards knit or backwards purl, but switching between them is not very fast, so I don't use this technique for ribbing or seed stitch.
I thought I would try something new today though. Here is a video of me knitting forward, then backward. I figured it would be easier than trying to explain it in words or even pictures.
If you are wondering, yes, there was a baby in my lap for filming.