header picture

Monday, November 30, 2015
Sunday, November 22, 2015
Presents for the Holidays
Although I don't celebrate Christmas myself, I do have relatives who do. As such, the season is an excellent excuse to give myself a deadline and make some presents. I am working on just two this year.
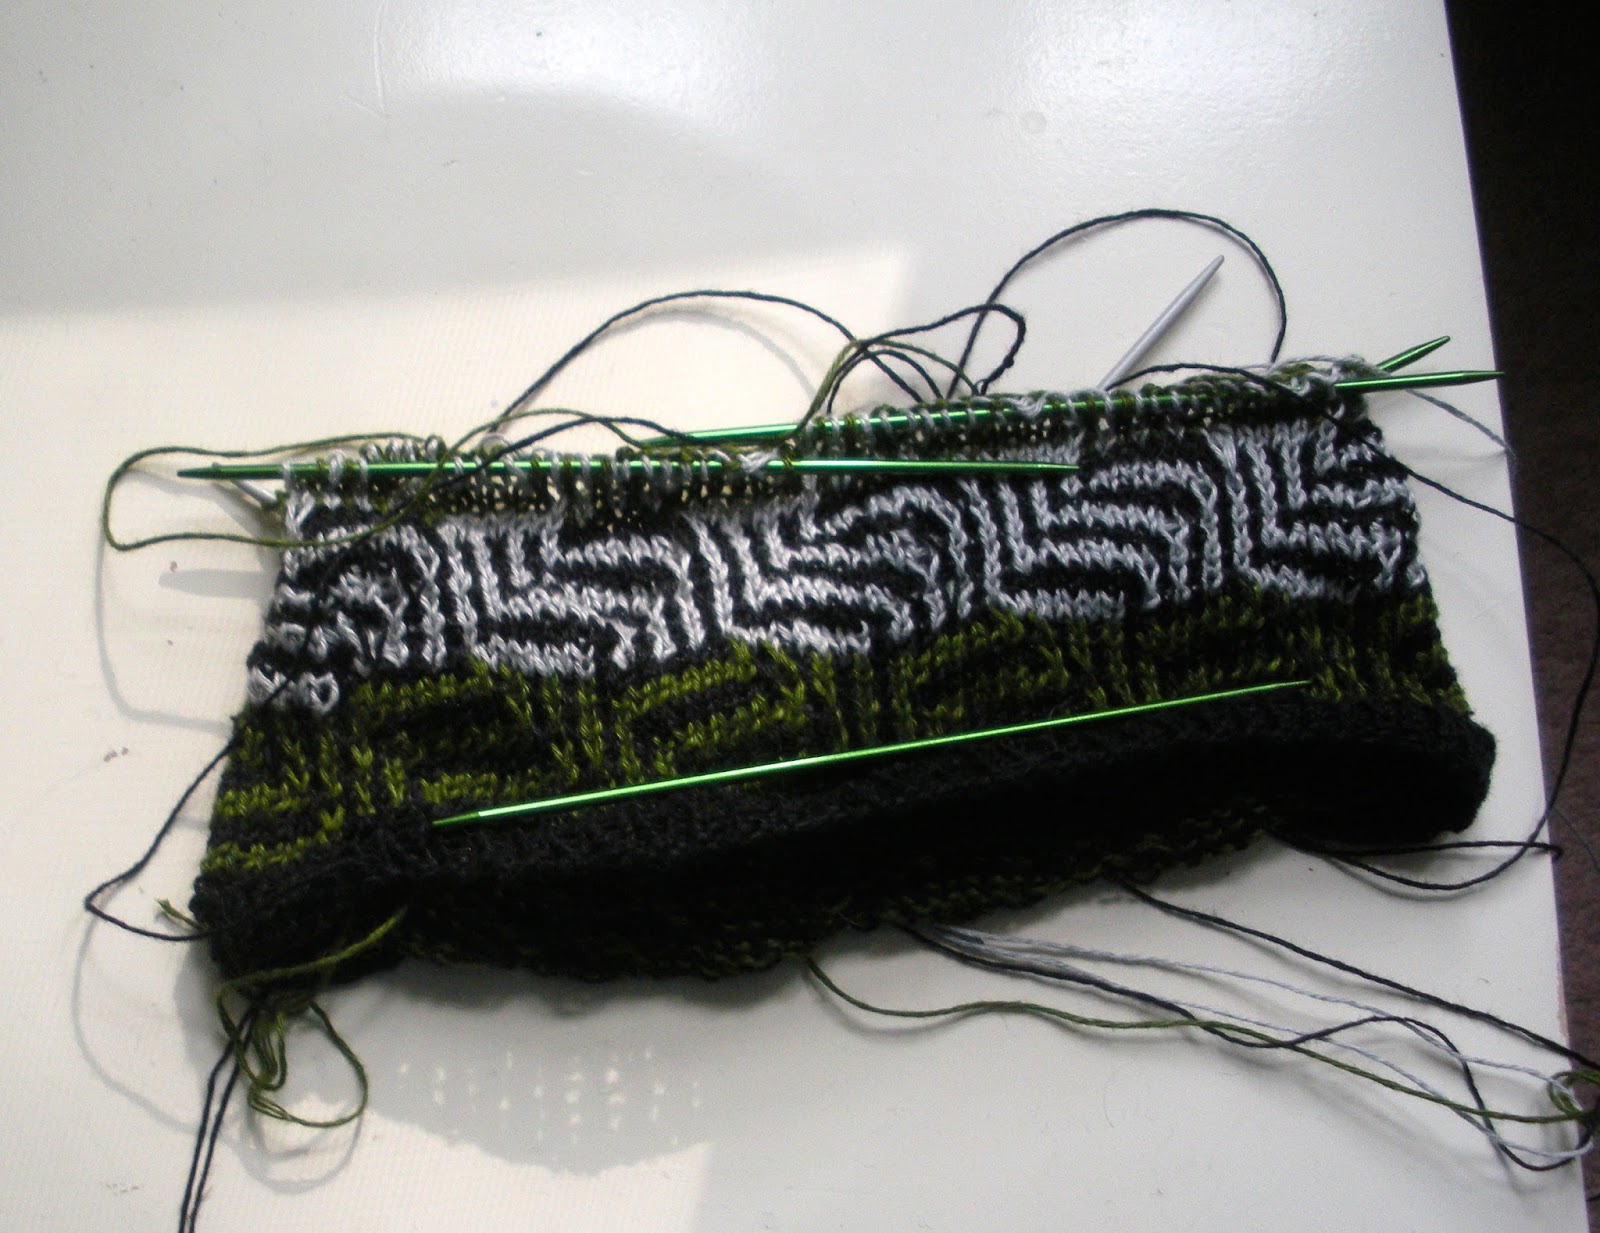
First, a hat (of course).
I have been working on this project off and on for almost a year, but, since I told my uncle last December that I would send it to him, I figure it would make a good Christmas present.
He is allergic to wool, so I figured that I would use the linen yarn that I bought on a whim a few years ago. I had never worked with linen before, and it is a bit like cotton. However, even more than cotton, it does not stretch. At all.
All mistakes are much more obvious, although I haven't had any problems with muscle pains after knitting it that I have heard can be an issue. It also falls off the needles all of the time (I am knitting the project on double-pointed needles). After trying it, I think that linen is definitely better on the loom, but I also recommend trying it at least once, if only to better appreciate the loveliness of wool.
So, the pattern.
I am making a mosaic pattern, which is a color pattern that uses slipped stitches. The pattern is based loosely on the Amazing Hat by Melanie Hoffman. However, I have added an extra twist, by using three different colors, instead of two.
The linen is having an interesting effect with this kind of pattern as well. Wool or acrylic would stretch and make a mostly flat material. But the linen is making an interesting three-dimensional effect.
I hope I can finish this one in time. It doesn't travel well.
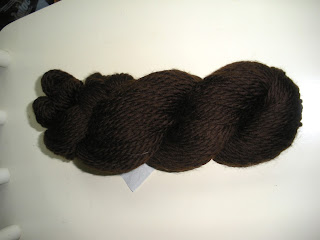
The second gift is a simpler pattern, but I spun the yarn on the wheel.
Last post I mentioned the gradient wool-silk blend that I was spinning on my castle wheel. Well, I finished the yarn, although the leather connecting the footman to the treadle broke, so it was finished on the other wheel. It also bled blue dye when I did the wet finish, but it doesn't look like it effected the color that much.

I am making the Wingspan shawl. So far, the pattern is very easy, and great for knitting in class. This is my first time knitting with an unplied handspun, and I am worried that the fabric will bias. It shouldn't matter with this pattern though.

Hope they will both be enjoyed!
First, a hat (of course).
I have been working on this project off and on for almost a year, but, since I told my uncle last December that I would send it to him, I figure it would make a good Christmas present.
He is allergic to wool, so I figured that I would use the linen yarn that I bought on a whim a few years ago. I had never worked with linen before, and it is a bit like cotton. However, even more than cotton, it does not stretch. At all.
All mistakes are much more obvious, although I haven't had any problems with muscle pains after knitting it that I have heard can be an issue. It also falls off the needles all of the time (I am knitting the project on double-pointed needles). After trying it, I think that linen is definitely better on the loom, but I also recommend trying it at least once, if only to better appreciate the loveliness of wool.
So, the pattern.
I am making a mosaic pattern, which is a color pattern that uses slipped stitches. The pattern is based loosely on the Amazing Hat by Melanie Hoffman. However, I have added an extra twist, by using three different colors, instead of two.
 |
| Amazing Hat |
I hope I can finish this one in time. It doesn't travel well.
The second gift is a simpler pattern, but I spun the yarn on the wheel.
Last post I mentioned the gradient wool-silk blend that I was spinning on my castle wheel. Well, I finished the yarn, although the leather connecting the footman to the treadle broke, so it was finished on the other wheel. It also bled blue dye when I did the wet finish, but it doesn't look like it effected the color that much.

 |
| Loving the colors |

 |
| Still loving the colors |
Thursday, November 5, 2015
Spinning Wheels
While there was a lot to learn when I first started spinning, it was all in about wool and yarn. The twist angle, number of plies, thickness of the yarn, washing, and finishing. Even dying and color. There was, of course, plenty to learn, but it was about fiber. As a knitter for 20 years, I knew about fiber. And what I didn't know, I had a basis for learning. One of the nice things about spinning, and why I think every serious knitter should learn it at least a little bit, is that it expanded on knowledge I already had. I see myself looking at yarn offerings at the store in an entirely different light.
But that was as long as I stuck to spindles.
There is something so simple and intuitive about a spindle. Sure, they come in a wide variety of weights and styles, but if you pick one up and twirl it around a bit, you know what you have. There are no complicated problems with spindle repair. (Not that spindle spinning doesn't require skill, but it is almost entirely in the realm of fiber.)
But then I got a wheel. Not just any wheel, but a finicky vintage wheel that only sometimes worked. And I found myself in a whole new realm of knowledge.
I know almost nothing about woodworking. In middle school, our shop class made shelves, and that is the last woodworking project I did. But suddenly I was heading off to the hardware store for lubricant and dongles of all kinds, trying to diagnose a complicated machine.
The crack in the foot pedal was the easiest. I bought wood glue and a clamp.
Everything else was mysterious.
Getting another wheel that mostly worked was very helpful. It helped me understand what the wheel was supposed to do and what it wasn't.
And, after much trial and error, I actually have a working machine. Yay! It still only has two bobbins, but you do with what you have. I've actually been spinning on it in the last few days, and it is beautiful.
It helps that the fiber is gorgeous and easy to spin. It is a mix of Blue-Faced Leicester wool and silk, and the colors are amazing. I picked it up at Maryland Sheep and wool, from knittyandcolor.
Of course, now that the vintage wheel is working fine, I have started another project: decorating the Ashford wheel.
At first, I tried staining it dark. Then it turns out that beechwood just doesn't take stain at all. I am pleased to say, though, that I tested it first in a place that can't be seen, so no harm done (just the loss of money).
But I have added some decorations. That big, flat wheel was begging for some paint. Of course, my painting skills leave a lot to be desired, so I stenciled. I took the picture off the internet, used an exacto-knife to cut it into cardboard, and used a sponge to paint it on. I don't think it came out too bad. What do you think?
I know, there is still more paint to be added. I need to take another trip to the hardware store for supplies.
But that was as long as I stuck to spindles.
There is something so simple and intuitive about a spindle. Sure, they come in a wide variety of weights and styles, but if you pick one up and twirl it around a bit, you know what you have. There are no complicated problems with spindle repair. (Not that spindle spinning doesn't require skill, but it is almost entirely in the realm of fiber.)
 |
| Basic spindle |
I know almost nothing about woodworking. In middle school, our shop class made shelves, and that is the last woodworking project I did. But suddenly I was heading off to the hardware store for lubricant and dongles of all kinds, trying to diagnose a complicated machine.
 |
| A mysterious, complex machine |
The crack in the foot pedal was the easiest. I bought wood glue and a clamp.
Everything else was mysterious.
Getting another wheel that mostly worked was very helpful. It helped me understand what the wheel was supposed to do and what it wasn't.
 |
| Is that actual yarn I see on the bobbin? |
 |
| Not sure that this picture does the yarn justice. |
 |
| You can see how bright it is. |
At first, I tried staining it dark. Then it turns out that beechwood just doesn't take stain at all. I am pleased to say, though, that I tested it first in a place that can't be seen, so no harm done (just the loss of money).
But I have added some decorations. That big, flat wheel was begging for some paint. Of course, my painting skills leave a lot to be desired, so I stenciled. I took the picture off the internet, used an exacto-knife to cut it into cardboard, and used a sponge to paint it on. I don't think it came out too bad. What do you think?
 |
| A dragon taking off and landing |
Sunday, November 1, 2015
Project Updates
I have been getting quite a bit done on the projects that I have mentioned before, so I figured it was time for a basic update.
First off, I mentioned back in July that I was making dryer balls with the combing waste from my shawl project. I have now felted five of them and have a sixth one stuffed and ready for felting. I finished off the last of that ugly green yarn that I made as an experiment.
They aren't exactly pretty, but they seem to be doing their job, and they scratched my itch to never throw anything out, even combing waste.
Speaking of the shawl, I have now finished two skeins of laceweight yarn, and I am currently plying the third, and final, skein. It has been a really useful experience to make so much yarn of the same type, and keep it consistent. I can tell that I have improved since I started the first skein. I am not sure anyone else would notice the difference though (or I hope not, they are all going into the same shawl).
In August, I talked about my spinning lesson and the experimental yarn with the blue BFL top. I have finished all of the roving I received, into about 150 yards of extra-bulky three-ply yarn.
I had initially over-plyed the stuff that I did in class, so I had to run it through the wheel again to make it more balanced. By the end, I think I was really getting the hang of Navajo plying though. No current plans for the yarn.
In August, I also wrote about a skirt that was on my needles. Progress has been slow (small needles, big project) but I have added a few more inches since I last wrote.
And finally, just last week I wrote about a hat that I was working on. The hat is off the needles and I have started a matching scarf.


I think it came out looking great! The crown was a bit of a challenge, mostly because the instructions were so over-wordy, but I managed in the end to figure it out.
That is all I have for now. Happy crafting!
First off, I mentioned back in July that I was making dryer balls with the combing waste from my shawl project. I have now felted five of them and have a sixth one stuffed and ready for felting. I finished off the last of that ugly green yarn that I made as an experiment.
 |
| Felted dryer balls |
Speaking of the shawl, I have now finished two skeins of laceweight yarn, and I am currently plying the third, and final, skein. It has been a really useful experience to make so much yarn of the same type, and keep it consistent. I can tell that I have improved since I started the first skein. I am not sure anyone else would notice the difference though (or I hope not, they are all going into the same shawl).
In August, I talked about my spinning lesson and the experimental yarn with the blue BFL top. I have finished all of the roving I received, into about 150 yards of extra-bulky three-ply yarn.
 |
| Chain-plyed BFL top |
In August, I also wrote about a skirt that was on my needles. Progress has been slow (small needles, big project) but I have added a few more inches since I last wrote.
 |
| Beach skirt: a bit more modest now, but still racy |


I think it came out looking great! The crown was a bit of a challenge, mostly because the instructions were so over-wordy, but I managed in the end to figure it out.
That is all I have for now. Happy crafting!
Thursday, October 22, 2015
Brioche Hat
I needed a project small enough that I could knit it standing up (while waiting for the bus), interesting enough that I could do it for 20 minutes with nothing to distract me, but easy enough that I wouldn't need a pattern in front of me.
So I started another hat. Now you know why I have so many hat projects.
I actually already have a hat on the needles, but it is a complicated mosaic pattern on yarn that needs good tension (read: must be sitting down) on double pointed needles (read: doesn't travel well). I'll try to post something about that project sometime soon.
But today, I am going to talk about my new brioche hat.
For my birthday, my boss gave me a gift card to my LYS. Dangerous, I know, tempting me into the shop when I have so much stash to use already. But I was good. I bought two bulky-weight skeins of yarn, one solid, one variegated. They were super-soft (merino wool) and I was thinking that I needed a winter hat for myself, so I can stop borrowing my husband's.
I was looking for patterns that would highlight the two colors together. My mother-in-law has been working in brioche stitch, and it looks great, so I was thinking that I would try the same. I found a great brioche hat pattern in one of my knitting books: Weekend Knitting by Wendy Easton.
I don't use the patterns in my books nearly as much as I should. I have a bunch of them that I have bought or that have been gifts (that's actually most of them). I love my stitch dictionaries, but I rarely follow patterns too closely. And so many of the patterns I have are colorwork or need specific yarns: I would rather use the yarns I have.
That said, I had never tried brioche before, and I had heard that it was really hard. Having done it, it is not too bad, but takes a bit of time to get the hang of it and figure out what is going on. A youtube video helped too: trying to describe it is very difficult. But, I will put in my two cents: maybe it will help someone who thinks like I do.
This is the pattern in the round, which is easier (I found):
Set up (color 1): knit 1. *put yarn to front and slip 1 purlwise. knit 1 without putting yarn to back to make a yarn-over. repeat from *.
Round 1 (color 2): put yarn to from and *slip 1 purlwise (this will be color 1). yarn-over. purl two together (1 yarn-over of color 1 and one stitch of color 2). repeat from *.
Round 2 (color 1): knit two together (1 yarn-over of color 2 and one stitch of color 1). *put yarn to front and slip 1 purlwise (this will be color 2). knit two together without putting yarn to back to make a yarn-over. repeat from *.
Repeat rounds 1 and 2.
To do it flat, do a four row repeat: round 1 (color 2), round 2 (color 1), turn, round 2 (color 2), round 1 (color 1).
My hat looks like this so far:
The material is really stretchy and thick, and I love how the colors look.
Depending on how the crown goes, I might submit this one to the state fair.
So I started another hat. Now you know why I have so many hat projects.
I actually already have a hat on the needles, but it is a complicated mosaic pattern on yarn that needs good tension (read: must be sitting down) on double pointed needles (read: doesn't travel well). I'll try to post something about that project sometime soon.
But today, I am going to talk about my new brioche hat.
For my birthday, my boss gave me a gift card to my LYS. Dangerous, I know, tempting me into the shop when I have so much stash to use already. But I was good. I bought two bulky-weight skeins of yarn, one solid, one variegated. They were super-soft (merino wool) and I was thinking that I needed a winter hat for myself, so I can stop borrowing my husband's.

 |
| Cascade 128 Superwash |
I don't use the patterns in my books nearly as much as I should. I have a bunch of them that I have bought or that have been gifts (that's actually most of them). I love my stitch dictionaries, but I rarely follow patterns too closely. And so many of the patterns I have are colorwork or need specific yarns: I would rather use the yarns I have.
That said, I had never tried brioche before, and I had heard that it was really hard. Having done it, it is not too bad, but takes a bit of time to get the hang of it and figure out what is going on. A youtube video helped too: trying to describe it is very difficult. But, I will put in my two cents: maybe it will help someone who thinks like I do.
This is the pattern in the round, which is easier (I found):
Set up (color 1): knit 1. *put yarn to front and slip 1 purlwise. knit 1 without putting yarn to back to make a yarn-over. repeat from *.
Round 1 (color 2): put yarn to from and *slip 1 purlwise (this will be color 1). yarn-over. purl two together (1 yarn-over of color 1 and one stitch of color 2). repeat from *.
Round 2 (color 1): knit two together (1 yarn-over of color 2 and one stitch of color 1). *put yarn to front and slip 1 purlwise (this will be color 2). knit two together without putting yarn to back to make a yarn-over. repeat from *.
Repeat rounds 1 and 2.
To do it flat, do a four row repeat: round 1 (color 2), round 2 (color 1), turn, round 2 (color 2), round 1 (color 1).
My hat looks like this so far:
 |
| Outside |
 |
| Inside |
The material is really stretchy and thick, and I love how the colors look.
Depending on how the crown goes, I might submit this one to the state fair.
Saturday, October 17, 2015
Sheep to Shawl: Part IV
Part I covered washing the fleece, Part II covered prepping it, Part III covered spinning singles.
As of today, I have about 750 yards of spun, plied, and finished yarn. I think I will be doing one more skein, but I am taking a little break first and working on some bulky yarn to keep myself from getting into a rut. Still, I think it is time to show off some of what I have been doing.
When I last wrote about this project, I was about of a third of the way finished with the first bobbin. Two months later, I have finished two full bobbins-worth of yarn, plied them together, and finished the yarn.
I have a lovely tensioned lazy kate for plying, and it really helps to keep the yarn even.
I keep the lazy kate a few feet back from where I am sitting, so that the singles have a chance to even out as they are winding on. I don't know how much it helps though, since they have been on the bobbins so long that they have settled and lost their twist energy (though it will return when I hit it with a warm bath later).
Where with spinning singles, the fact that I don't have a lace setting for my wheel was nice for a beginner (it gave me a lot of time to draft, since I was treadling 3 times for every inch of yarn) the lack was very much felt for plying. It took what seemed like forever, and not much to do but let it run through my fingers.
After I had finished plying, I wound it onto my niddy-noddy. I counted, and there were over 250 wraps of yarn on it when I was finished with one bobbin-ful, and I had two bobbin-fulls.
The first skein, I tied it with black yarn, because that is what I happen to have in lace-weight, and it doesn't really matter. The second was tied with the small bit of remaining singles. To tie it so that it won't get tangled when I finish, I wove the yarn in and out in four places. I have seen recommendations to "make figure-eights" but I never feel like just two divisions of the yarn is enough, so I make about 8.
Once I had left it on the niddy-noddy for a few days to settle, I took it off and got ready to finish.
When I finish yarn I usually don't thwack the yarn to make a halo, or anything fancy. Because there was still some lanolin on this, I just swirled it around in really hot water with soap to reactivate the latent twist energy and get out the lanolin and oils from my hand. Because it was so yellow, I also gave it a hot bath with some hydrogen peroxide. I don't think it really did anything though, comparing pictures before and after. Maybe I need more in the bath, but I am afraid of ruining the wool.
I don't have a large house, so I did all of my finishing in our bathtub with a bucket and a lobster pot (which we do not use for lobster). I hung the skeins to dry in the same place with plastic coat hangers.
The last step, after they were dry, was to twist them up for storage, and weigh them: 4.8 ozs, 752 yards of fine yarn.

As of today, I have about 750 yards of spun, plied, and finished yarn. I think I will be doing one more skein, but I am taking a little break first and working on some bulky yarn to keep myself from getting into a rut. Still, I think it is time to show off some of what I have been doing.
When I last wrote about this project, I was about of a third of the way finished with the first bobbin. Two months later, I have finished two full bobbins-worth of yarn, plied them together, and finished the yarn.
I have a lovely tensioned lazy kate for plying, and it really helps to keep the yarn even.
 |
| Yes, I keep my lazy kate elevated with a box of Apples to Apples |
Where with spinning singles, the fact that I don't have a lace setting for my wheel was nice for a beginner (it gave me a lot of time to draft, since I was treadling 3 times for every inch of yarn) the lack was very much felt for plying. It took what seemed like forever, and not much to do but let it run through my fingers.
After I had finished plying, I wound it onto my niddy-noddy. I counted, and there were over 250 wraps of yarn on it when I was finished with one bobbin-ful, and I had two bobbin-fulls.
The first skein, I tied it with black yarn, because that is what I happen to have in lace-weight, and it doesn't really matter. The second was tied with the small bit of remaining singles. To tie it so that it won't get tangled when I finish, I wove the yarn in and out in four places. I have seen recommendations to "make figure-eights" but I never feel like just two divisions of the yarn is enough, so I make about 8.
 |
| Skein #1 |
When I finish yarn I usually don't thwack the yarn to make a halo, or anything fancy. Because there was still some lanolin on this, I just swirled it around in really hot water with soap to reactivate the latent twist energy and get out the lanolin and oils from my hand. Because it was so yellow, I also gave it a hot bath with some hydrogen peroxide. I don't think it really did anything though, comparing pictures before and after. Maybe I need more in the bath, but I am afraid of ruining the wool.
 |
| Skeins getting a bath |
The last step, after they were dry, was to twist them up for storage, and weigh them: 4.8 ozs, 752 yards of fine yarn.

Tuesday, September 29, 2015
The Long and the Short of It
Which are better, long projects or short ones?
Long projects seem like they don't progress. You never have anything new to say about them:
"how is the sweater doing?"
"Fine, added another two inches this week."
They require a lot of advance planning at the beginning, then just stitching. And stitching. And stitching.
But... the payoff at the end is amazing. You can look at whatever it is and say, "I made that." It is the most gratifying feeling in the world.
With short projects, a larger part of them is the fun planning stages, and less is the relaxing stitching stages.
There is nearly instant gratification, though smaller.
They are easier to carry around.
And, there is more progress to share!
So, what do y'all think? Short or long?
Subscribe to:
Posts (Atom)

