header picture

header picture

Friday, September 16, 2016

Measuring and Documenting Yarn

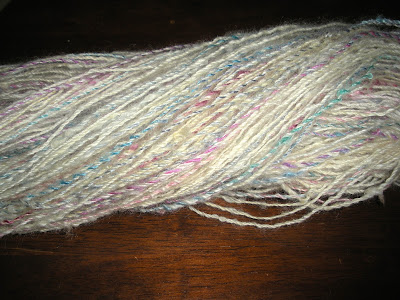
Whelp! Another spinning project finished!
I'm calling this "Cotton Candy Confetti Yarn"
I started planning this yarn way back in May 2014, when I first bought the wool at Maryland Sheep and Wool, but I started it on my spindle just this May. I mostly like how it turned out, but the colored bits make it more obvious that the wool had a bit of a golden tint (lovely in the lock, less so when mixed with pink and blue).

I don't have a project in mind for it yet, but I thought I would share some tips on measuring and documenting spinning projects - and mystery items in the stash that have lost their labels.

First, the platform. A lot of people tie samples of their handspun to index cards, or tape them in notebooks. The advantage of this is that you get to look back at your yarn with all five senses if you want (not sure why you would want to taste your yarn, but you could). I use Ravelry to keep track of my projects, because I find that a lot easier, but it would be nice if I could feel the softness or tension of the yarn that I made.

That said, if you don't have a sample with your description, a picture is pretty crucial. I spend a lot of time on my computer adjusting the colors of my photos to try to make it look close to how the yarn actually looks. You may have noticed that I often include a coin in my pictures, to give a sense of scale, as well.

After you have a picture or a sample, the next thing to include in your documentation is your fiber source. If you are dealing with handspun on Ravelry, you can link directly to a fiber page, hopefully with pictures and details on breed or fiber-mix. On a physical sample card, you can include a small sample of the fiber along with the yarn. Be as detailed as you can about what state the fiber was in when you got it (in the grease? mill-carded into roving?) and as much as you know about the animal it came from. If it is mystery fiber, you can always try a burn test, though the results are not that useful for blends.

I unfortunately didn't record much info about the colored locks in the cotton-candy yarn: I know they were a soft longwool or mohair, and I bought them as dyed locks - I don't even know from which booth at MD S&W. But, since that is what I have, that is what I recorded.
Assorted dyed locks - unknown breed
On the other hand, I have recorded both the breed and source for the white fiber. I don't know the name of the individual sheep, or the full parentage, but, since I was not thinking of buying a fleece, it is not so important.
Undyed, washed, Lincoln-Crossbreed locks; from Barnswallow Fibers and Yarns.
After indicating the method of fiber preparation (I spun from picked locks with no further prep by me) and any particular spinning methods used (corespinning, navajo-ply, etc), it is time to measure the yarn.

First, weigh it. I general record in ounces because the fiber is sold that way in the US, but the units don't matter, as long as you indicate which ones you used - 4 ounces is very different from 4 grams.
4.75 ounces of yarn
This weight can be useful later, in checking how much you have used up, and whether you will have enough.

Next, you want the amount of yarn in length. Always check this after you have wet-finished the yarn, as that may shrink it a bit. Stretch out your skein and use measuring tape to get the length of one round, count the rounds, and multiply.

Always re-measure the skein after washing, even if you know the length of your niddy-noddy.
My skein was 55 inches around, and there were 181 wraps, which equals 9,927 inches or 277 yards. Since you have the weight and the length, you can calculate the grist (in yards per pound) but I don't find it a particularly helpful number.

Finally, I calculate the "weight" or width of the yarn, in wraps per inch (WPI). This is not super-accurate, because different people wrap loosely or tightly, but the idea is that you wrap your yarn around a ruler and see how many "wraps" there are to the inch. The yarn shouldn't be stretched, and it shouldn't be packed in too much either.

13 WPI

Unfortunately, I haven't seen a lot of agreement matching WPI to weight. Depending on the source, 13 WPI is either a heavy fingering or DK.

Although I don't, twist angle is another possible measurement - just use a protractor.

Sunday, September 4, 2016

When do You Fix It?

Much of the beauty of knitting is in the careful repetition and symmetry of stitches. A project, whether you are working off of a pattern, using a stitch from a dictionary, or are improvising, is usually regular in some way. Even if the person doesn't know the pattern, they may well notice that one part doesn't look the same as the others.

Even worse, because of the repetition, later parts of the pattern rely on there being the right number of stitches. Especially in the round, if you are repeating by 8, and you mess up so that you end up with 55 stitches, it is not going to look right.

Still, many mistakes will be invisible to the average observer. Few people will be staring at your project up close for hours (exception: spinning projects, but it will probably just be you). When do you tink back, frog,  or start over, when do you make a "good enough" fix, and when do you ignore it completely?

I rarely will frog or start over (this explains my vest with the ridiculously large sleeve holes). It is just so frustrating to realize that something is not working out, sometimes you just lie to yourself, and let yourself be lazy. Well, I do at least. Once something is done, I want it to stay done. I don't want to do it a second or third time.

A scarf from 2013 that shouldn't have been finished
But I rarely just let a mistake sit there - except for sizing mistakes, I haven't quite got the hang of that one. There seems to be an extra stitch where there shouldn't be one, but there are no gaping holes in the piece? Just add a decrease as soon as you can and hope you counted right. Find yourself one stitch short? Make one, it probably won't matter. Did an entire repeat of the pattern backwards, offset, or upside-down? Eh, call it a design element and do it that way again after a few repeats.

Heck, the first sweater I ever made (sorry, I don't have a photo) I hadn't knitted in several years. So I wrapped all of my purl stitches backwards and twisted them, and didn't realize that this was wrong until half the sweater was done. Well.... it was just a thicker, warmer sweater than I was planning (and was too small for my brother to wear, so it got donated to charity). It's not a mistake if people don't know the original pattern, it's an original design.

Sometimes, a mistake can just be fixed without too much effort. If you miss a yarn-over in a lace pattern and catch it within a few rows, you can usually, just make one and bring it up, and it will just be a little bit tighter than otherwise - barely noticeable.

But sometimes, you make a mistake in adapting the pattern, and it takes you awhile to notice. Then, you have only two options - start over or change the pattern. In the most recent hat I was making, I cast on 68 stitches. Most of the hat consists of k2 p2 rib, so I figured it didn't matter, as long as it was a repeat of four. Well, it turns out that the decrease for the crown of the hat is an eight stitch repeat. Lesson: always read the whole pattern before starting. But what to do? Just doing the pattern halfway would look odd, because the hat is knit in the round.

Rather than starting over, I wrote a new pattern of decreases. The number of decreases per plain worked stitches was the same, to keep the shape similar, but it was done in a four-stitch repeat, rather than an eight-stitch repeat. It worked out well, and I can't actually tell the difference.

Undyed jacob wool hat for dad
I also misread the pattern for my shawl. I wanted it to be wider that the original pattern called for, so I added additional repeats of the lace pattern - so far, so good. The repeat was 16, so I cast on 160 stitches, and worked it for a full three inches. I wanted squares of a different pattern on the corners, so the first and last repetition were just done in seed stitch. And then, I started to follow the pattern for the edges and my mistake was all too clear - the original pattern had four additional stitches on the edge to keep the piece from curling!

I had seen that there was two stitches of seed stitch on the beginning and end of each row to keep the edges from curling (stockinette will curl, especially when tightly knit; garter and seed stitch will not). What I hadn't noticed was that they were not included in the chart - they were extra.

At this point, I had a choice: start over with four more stitches or adapt the pattern. I couldn't add four more stitches at this point, because it would ruin the rectangular shape of the piece (I think. Maybe it could have worked). Well, of course I chose to just go with it, because I am me, and it has been giving me trouble ever since. Since I can't follow the original pattern, every row I need to figure out what to do with the first few and last few stitches. I have a placeholder to make sure that I don't accidentally add or subtract stitches, but my choices have not been terribly consistent, and the border looks ragged. At least to me.
Ragged, inconsistent edge.

This was supposed to be a rectangular shawl! Maybe it will look better after blocking. Which will be sooner rather than later: the shawl is more than halfway done at this point, assuming I don't decide I need to spin more yarn.

Progress on the shawl as of the beginning of September