header picture

header picture

Sunday, February 28, 2016

Card and Spin

As I continue work on the shawl and skirt, I just thought I would tell you about a little side spindling project I have been working on, on and off (mostly off).

Last summer, I told you all about the Navajo Churro outer coat that I was combing and spinning. Well, the undercoat was not completely lost in the shuffle. I have been carding it, since the fibers are so short, and spinning it on my drop spindle. I hope that I can get something soft enough for some thick warm socks this time.
Singles on the spingle

Today though, I thought I would show you my process of carding the wool. It is not a tutorial, but some of you who knit or spin but don't do your own processing might find it interesting to see how it works - even if the commercial preparation looks completely different.

First, a quick guide to fiber prep. Previously, I showed you a combed preparation. That creates a smooth "top" that is usually used in worsted preparation. Yarns made from top are generally tight, with little air trapped in them, and show stitches well, with good definition.

Today, I am talking about carding. Hand carding creates "rolags" which are small airy bundles of wool. They are not smooth, and the usual preparation with them, woolen, creates warm, fluffy yarns with little stitch definition. It is a good prep for short fibers.
Bag of Navajo-Churro under coat
First, spreading the fibers a bit with my fingers, I lay them on my cards. They don't have to be flat, or aligned, just mostly ensnared in the tines of the cards.
Fiber placed on the card and ready for carding
The hand cards, by the way, are a great tool, and there are few substitutes. Unlike with combing, pet brushes just do not work, in my experience. You need a very large, strong "brush" with thick tines. Because there are not really any alternatives, they can be pretty pricey, and they don't work well with longer fibers (5"+). A set of cards was one of the first tools I bought, thinking they were a good multi-purpose tool, but, if you are just starting out, I would go with a flicker or pet comb first.

In the second step, brush across the card with the other one, pulling out the snags and letting more air into the fibers while you gradually make your pile of wool more uniform.
Result of several passes through the cards
As you brush, you transfer the fiber back and forth. You want to card the "back" of your fiber bundle, just like the front, so you occasionally transfer everything to one side or the other.
Transferred and ready for a second pass
After it has gone through a few times, you pull it off, roll it up, and twist it into a spiral for storage.
Rolag straight off the cards

Rolled between my hands to be more compact

Rolled up for storage
The fiber drafts easily and evenly from this prep, as long as you store it in a way that it doesn't get too compressed.
Carded prep makes some nice fuzzy yarn on my steam-punk inspired spindle from Snyder Spindles


Sunday, February 21, 2016

Sheep to Shawl: Part V

Part I covered washing the fleece, Part II covered prepping it, Part III covered spinning singles, and Part IV covered plying and finishing yarn. This part will cover starting to knit the shawl.

I know it has been awhile. I had to spin and ply a third skein for the project, then I put it on hold while I finished some presents for the holidays. But last week, since I finished the astronomy hat, I decided to jump into the next step with both feet.

So, what is the next step? Choosing a pattern.

I knew that I wanted to do a lace shawl, but that still leaves a lot of patterns.

The first step to choosing a pattern is to set parameters. So, these were my parameters:

  • Lace
  • Looks good in white (no dyeing for me!)
  • Rectangular
  • Uses lace-weight yarn
  • Airy
  • Minimal looking at the pattern required (nothing where each row is unique)
As you can tell, some of these were structural, and some were design elements.

The next step, for me, in choosing a pattern, is to look through my stitch dictionaries to see if there was any stitches I could use without modification. I like using the stitch dictionaries, because it allows my piece to be "mine," but I didn't find anything that particularly inspired me.

After that, I looked through my lace books. I didn't find anything that matched my criteria - most of the shawls available were not rectangular (though beautiful, I may have to go back and do another some day).

Finally, I used Ravelry's pattern search. Some of my criteria (lace, rectangular, uses lace-weight yarn) could be put into the search directly. Other criteria would have to be judgement.

My final selection was the Lattice Lace Wrap designed by Lou Schiela, although I will be skipping the beading.

Something in the pattern just called to me. It was nice and repetitive, without being boring. I like criss-cross patterns - someday soon I will do a post on entrelac. It looked very airy, and could be expanded to a different width without much trouble.

Before I made the plunge, though, I had to do a test knit or two. These are especially important for hand-spun, since there is no other way to get a gauge - My finished yarn looked lace-weight to me, but there was no way to make sure that it would work in the pattern, or which needles to use, without testing.

I did two test swatches. The first, on size 5 needles:
Lace swatch #1, unblocked
The second was on size 6 needles:
Lace swatch #2, unblocked
If I was a good planner, I would have blocked them and measured the gauge, maybe kept them in my pocket for awhile to test their wearability, put them through the wash, and otherwise tested them to see how the shawl will look over time before starting to knit. I recommend that you do these things, especially if you are making a shaped garment.

But I don't have the patience. I started knitting right away, as soon as I chose my needle (size 5, I think it looked a little nicer that way), and have one repeat of the pattern finished.
A good start on the shawl

Close up
And, even though I have already started knitting the shawl, I did do a light blocking of the swatches to see how they might turn out. I am worried that the pattern won't be very visible without the beads.

Swatches, lightly blocked (no pins)
It should be awhile before I do another of these posts. The shawl is likely to take a long time to complete. But I will attempt to amuse you in the mean time with other projects.

Sunday, February 14, 2016

Buying Yarn

As a long-time knitter, I have a large stash of yarn that I have collected over the years. There are generally four ways that I have added to my stash.

1. People give me things from their stashes. Some of these are kind of funky, and not really my style. As my stash has grown, it has gotten easier to say no to things that are really out there. But it was useful as a beginning knitter when I was still finding my style (and I didn't have much of a budget, since I was in high school).

2. I have a particular project in mind and I go buy some yarn that will fit it. I rarely do this anymore, because I have so many projects lined up with the yarn I do have. Even if I do have a project in mind, I can usually find something in my stash already that I can use. A couple summers ago, however, I decided to make a Jayne Hat as a birthday gift, and didn't have any of the necessary brick red, so I went out to buy some.
My husband wearing his birthday Jayne Hat
3. I go to a store or festival and see some yarn I would like. I carefully think about a project that I could use it for, and try to buy enough yarn for that project. If I can't think of a project, I don't buy the yarn. Of course, I rarely actually buy enough for the project I am thinking of, and then halfway through the project I have to scramble to find more, hopefully from the same dye lot. But at least there is a plan, even if it takes me awhile to get to it. This is the buying method I aspire to.
4. I see some yarn that is on sale or really nice, and I buy it, with no particular project in mind. Beware if you do this too much, it is a great way to grow an unmanageable stash. If the yarn is particularly funky, or an odd material, this is especially hazardous. I still have some bamboo yarn that I bought on sale in 2010 and haven't managed to make anything out of - and of course it is discontinued, so I have no way of getting more if I decide to make something larger.

Of course, this introduction is just to say that I was a bad girl this week and employed method number 4 quite liberally. A local yarn shop (that I had never been to before) was going out of business. Everything was half off. We arrived late in the day, and it was pretty picked over. Something about the nearly empty shelves, the short time frame,  and the cheap yarn made me forget all of my usual yarn-buying cautions.

I got a bit of something with nothing that will match it, so it will only be good for very small projects.
Just over 100 yards of Baby Alpaca Chunky, from Cascade Yarns
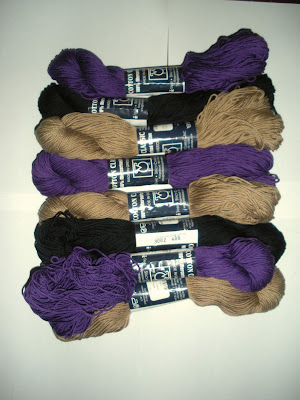
I got a bunch of cotton, in three colors, with no plan for it. I always manage to forget how few projects are written for three colors, even though that is my preferred color-palate strategy.
Three colors of Tahki Yarns Cotton Classic
I also got three different sets of yarn in one of my favorite color combinations: blue and black/dark brown. One is merino, one is superwash wool, one is a mix of acrylic and wool (no idea now why I bought that, I usually hate working with acrylic).

Merino wool: Ewe Ewe Wooly Worsted

A close up of the colors: chocolate and indigo
Superwash wool:  Rowan Pure Wool, in azure and clove
Acrylic: Plymouth Yarns Encore Chunky, in light blue and black
It is not as bad as it could have been, though, I didn't get anything that I will never use (hopefully). And I also got some neat non-yarn things: another book on different types of wool (In Sheep's Clothing), a recent issue of spin-off magazine, a shawl pin, another needle gauge, and a frame for blocking socks.
Shawl pin, yarn gauge, sock blocker

Tuesday, February 9, 2016

Astronomy Hat

So, now we have an answer to "can this project be salvaged?"

Sort of.
Astronomy hat on intended astronomer
While I was able to fix the crown, and it now more closely resembles a hat, it had other problems with the design which were not apparent at first. Most notably, it was too big, and was sort of hanging on the head. Ideally this kind of design would be tight to keep the wind out.

The pattern came out quite pretty though. I particularly like how the variegated grays mimic a sky full of stars in photo negative.

Astronomical negative side
And the moon certainly looks moon-like, though a bit too close to the horizon now that I have a full-size crown.
Moon side
And I like how the sunrise colors came out on the earflaps.
Meteor side

The shape reminds me of a military helmet though, instead of a winter hat.

In any case, I decided to see if I could make it a bit smaller by felting it. The good news: it got smaller. The bad news: it turns out the gray yarn is super wash wool, and does not felt (always check!) which makes it a bit baggy on the inside of the hat, like I had used a larger needle. Also, it didn't shrink enough and became pretty stiff.
You can see how big it is on him, and this is after felting it.
So, in conclusion, it is a useable hat at least. But kind of an ugly one.